Ryan Gosling 'K' - Blade Runner 2049!

I have been busy with creating some material regarding the collar.

Mechanismo made suggestions for a custom collar. The specs he came up with are derived from the 1:6 K figure and the measurements are for a mod of the WSL coat. Shifting the collar is part of it, but that is not the aspect I want to elaborate on.

I want to update the specs for the collar because there is a problem with the funnel shape. If you cut the collar like he suggested, the funnel will be asymmetrical. I am sure when there is a head inside, the fabric will adjust itself and something workable is achievable. Geometrically there is room for improvement, though.

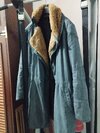
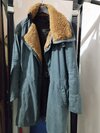
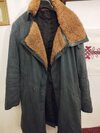
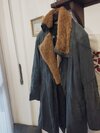
Now, photo material…

View attachment 1812126

These I made way back at end of 2022. They show how the right and left sides of the collar overlap when worn in the up position. The area of overlap is a triangle. When collar is down, you can see the protruding part on the right side. This detail has not been implemented by any coat provider. Either it hasn’t been noticed (which I guess because it is not intuitive to make it that way) or it has been ignored in favor of the more practical solution: making the right side of the collar straight. Then when it folds down the two magnets align and keep everything tidy.

Nevertheless, here are suggestions to get to more screen accurate solution that allows for two positions of the collar when worn around the face:

View attachment 1812127

View attachment 1812128

View attachment 1812159

View attachment 1812129

To be continued.
that's exactly what I was thinking about for any SR to buy, and about the right size proper SA collar pattern, I pointed out too:
no vendor has implemented correctly the protruding of the upper part of the right size (when folded in open position), and considering SR collar (at least from the measurements Seann wrote me, and also from what I could estimate from pics here) big enough to have room for such tweaking maneuvers, I was thinking about if just shorten the right side base, giving it a more funnel shape as ur pic above "collar front slanted" and with just the upper magnets to match, and no more the lowers (on any SR, cause the narrowness of the bep makes them already quite impossible to hold for long), but this only if I'll find it practical, cause I understood I hate pursuing SA at all costs and then have problem with fresh airflows entering the collar and freeze my throat and neck during winter if I just ride a bike. But It will be a matter of having that SR, and understanding in person how much could I work on it (if really needed and without any risk, also shifting the collar a bit -but not that much to exceed protruding the left side too much over the left lapel).

About that Gosling close-up (in the fog, approaching Sapper's house) you recalled too above, I must reiterate that it's still puzzling:
to me, it still shows something not consistent with the rest of the images when opened.


img.jpg


regardless of the 4 stitches, which although they are perhaps there (since that they are clearly visible in the museum version), I don't even like them and I don't see a clear confirmation of them in the film, which is why with an SR I think that to plug that hole, first I would try to see if already as it is less air passes through compared to the original bep, then possibly I would rather think about extending the piece of fabric that SR puts to make the joint, in order to increase practicality and coverage from the cold.

But I'll see this if and when I get SR.

However, I should say that I believe in some way they made a fixed junction for left collar and left lapel, nothing about zippers as wsl or detachable hooks as I saw here in Magnoli feedback (even if about wsl solution, it is surely smart for withstanding any breeze I guess). Despite many inaccurracies and things to think about tweaking, I don't even own it yet, but I bet SR it's the most stylish solution for that.
 
Last edited:
Recently I made these. In this scene we see K wearing his collar around his face very tightly and we get to see all the angles. It is very dark and picture quality is not the best because I had to take the pictures of my TV screen. Still sufficient, I think.

View attachment 1812149

Here we see him get out his spinner. We can see that the left collar part is already disconnected from the lapel. Every time he wears it in the up position, it is disconnected. Also seen, a zoom into a good side view with the angles of the funnel and a linear measure. Here it appears front and back side are of the same length. But K‘s shoulders may cover the lowest part of the collar.

View attachment 1812150

Depending on the perspective, it may even appear that the front side is larger. But that must be a thing based on what lenses they used for filming - it is deceiving. Either the collar is the same width all around or the back is a bit wider.

And it is very tempting to assign the blue part of the collar to the blue part of the new geometry. It just fits so nicely. But it could be wrong. The lower part of the collar doesn’t necessarily have to be straight and could be attached to the neck part of the coat in a curve, I think. Just leave out the blue part.

View attachment 1812151

Here is Mechanismo’s collar shape in paper form. I should have cut it in 1:2 scale because in 1:1 it was wobbly as hell and it took some time to keep this thing upright to take the pictures. But I could wear it around my head, ha ha. You can see that depending how you connect both ends, there is always a misalignment. Either the bottom is straight and the top is not or the top is straight (I inverted the pictures) and the bottom is not. Or you want the the overlapping part not to be a triangle and then it doesn’t align in two places. The funnel wants to be asymmetrical as well.

View attachment 1812152

So, back to drawing board.

View attachment 1812153

Beginning very small and then a 1:2 scale paper collar. The curvature is bit much but that is not a bad thing. You can clearly see which parts are curved and which parts are straight. The protruding triangle on the right side is there. The longer left side is a rectangle. It is symmetrical.

To be continued.
if I think about your pov as right, I should consider my bep still recoverable, possibly reducing a bit the buckram I put inside the collar to regain little room for at least the upper magnets of the collar to hold properly, and eventually I could really mind about waxing it (maybe trying that "acrylic wax" on other clothes too) in the future.

But it must be said that the only serious criticism of Jameel's work from me, is precisely that collar model which, even from pics, seems a little tight to everyone, and damn it should be revised and it should have been done from the beginning, it's certainly (along with the fabric, which over time I noticed has a color that doesn't suit me, and even the creases it holds were too much of a problem to remove) is the main reason why I wouldn't buy bep again at today, because it's also well-made funnel in proportion (even if the right side of the collar is made with no precise SA open shape for the reasons you also highlited for all the replicas vendors), but there's little to go around, what I did to lighten the color at all costs ending up with also some little scars to the fabric it's been an act of savageness but it has nothing to do with size flaws, the coat hasn't shrunk by my treatments, and I put a fur a little thicker ok, but that collar is small and tight and that's it, and I haven't had the necessary reassurances, despite having sometimes and repeatedly also written infinite poems, here, that things have then ever been improved as due.

For the rest, Jameel's work at least on mine was excellent (leaving aside the questionable choice of such a glue to hold the magnets in place, confirming that a potential problem with buying one of his coats is that it lends itself to few modifications -also about size fine tuning, that must be done in person, also moving magnets if needed- and the lining was a bit weak but I had already started my savage painting/washing cycles, so not too many complaints about that, at least from me), his attention to the details of the film, from what I have, surpasses any other replica (pocket seams, underarm shoulder turns, lumbar vent junction, cuts on the elbows, foam for piping, everything much more SA, I see many of those little details, as all absent on SR, and even the collar as much as it has this tightness relevant flaw, which is much more serious than anything else imho, remains with the right attachment and stylistically it should be fine).

I defined in some posts SR's fur as carpet-like matching others opinion, but I bet that in person it doesn't give a bad impression, although if you want similarity to the film you have to change it, of course.
 
Last edited:
thinking about modifications that go beyond the SA argument, significantly increasing the usefulness and practicality of the garment, I am thinking of adding an internal part in the shape of an elongated triangle, in black nylon, similar in color to the lining, which will create a sort of internal insert that allow the zip closure, I want the zip to start from the eyelet area at the waist, up to the base of the throat where the lapel will then close over them.
This would remain perfectly hidden and not mandatory to be used for closure, in the sense that the new part could be folded internally, perhaps with one of the invisible hooks like the ones I used on my bep where I created an additional hidden chest strap (a method that would no longer be needed), so as to use it when necessary (always if you want a practical closure, or windproof/coldproof, or greater compatibility with dynamic activities), or avoiding using it if you wear your coat quickly/rough and ready, remembering that this is a film and the cold that the replicant gets is his business and even if you can handle it, it's never too healthy in the long term

IMG_20240422_110413.jpg
 

Attachments

  • IMG_20240422_110440.jpg
    IMG_20240422_110440.jpg
    3.9 MB · Views: 35
  • IMG_20240422_110413.jpg
    IMG_20240422_110413.jpg
    740.5 KB · Views: 34
Last edited:
About that Gosling close-up (in the fog, approaching Sapper's house) you recalled too above, I must reiterate that it's still puzzling:
to me, it still shows something not consistent with the rest of the images when opened.


img.jpg


regardless of the 4 stitches, which although they are perhaps there (since that they are clearly visible in the museum version), I don't even like them and I don't see a clear confirmation of them in the film, which is why with an SR I think that to plug that hole, first I would try to see if already as it is less air passes through compared to the original bep, then possibly I would rather think about extending the piece of fabric that SR puts to make the joint, in order to increase practicality and coverage from the cold.

That is movie magic. The stitches are there when the costume department wanted to connect the collar and the lapel and otherwise they aren’t. The collar may even be longer on some of the coats when worn up.

This will automatically lead to compromises when you want to translate this into the a practical coat. A connection is preferable most of the time but if you want to show off the party trick of the K coat (collar up), I have found that the connection between collar and lapel makes it harder to wear. The weight of the coat is pulling on the front of the collar and deforms it a bit. If you want to turn your head more freely, that connection is also a concern.

Here is someone who wears his SR without the connection:


The unconnected collar just wears better because it has more wiggle room to adjust to the wearer’s head. I think that will be true for every K coat. And the collar of the modified SR seen here looks already better shape-wise than with the fixed connection.

On the other hand, SR was right to connect collar and lapel with not just cheap makeshift stitches but with a solid connection that will last because that makes the standard configuration (collar down) possible.
according to what I had already seen in this pic, the collar looks better but when open, the attachment on the right side is still too far forward.
The color here, comparing just the pics of this guy (also with the Gosling's one), seems really exceptionally SA, so that (SR), I would say "dead-nuts to the color", but as said, it depends from interpretations and different scenes to be inspired.

As I wrote in the past, annoyed by the drafts in the throat, I had already eliminated the 4 seams some time ago and stitched almost the entire line of the throat in a closed position, in this way the result was much more similar to the close-up of Gosling closed, and when opened, unless I really didn't analyze by zooming in on the area, you couldn't notice that it was all closed, I could reopen it and make a solution to the SR, but if I buy an SR anyway, I can leave this as is, so the problem here is currently it's the collar not big enough.

Since SR is slow to do what they always did in this period, and I will not change my mind a iota about what I said, I have therefore started the "bep resurrection" project (chapter 1001 :)) in my free time.
I implemented the vertical cut at the bottom (longer on the front), and a more SA double stitching line in that part, since I noticed every vendor chose to make it wider than the movie.
My current coat has some scars and little torn part to patch somehow, just minor scratches, but I think my project could lead to have it fully recovered for use it back again, I'm changing position to collar magnets also trying to give an effect that makes it more SA as you pointed out about the right side, to be protruded when folded open, let's see I can make it, but I'm pretty confident.
I tweaked the color again, darker again as it has a newer and better look in the end, because although I was satisfied, too many processes had still led to slightly haloed areas which were thus covered, also the PU that makes this twill of Jameel laminate, as I said can never lose the coating completely, as it is also part of the texture, and those parts, after being lightened as I did, could not lighten or take the color correctly, thus remaining to show a texture that became too similar to uncoated denim. By doing so, I restored shine and freshness to the garment, also masking much of the damage done.
If I can make the collar as I would like and more comfortable closed, and otter wax will do what the manufacturer declares it to do on their website (it even declares it bucket hand-washable), I could recover all the peculiarities both for a potential resale as a less worn and more functional garment, but in reality I might not even have plus all this interest in SR, if it turns out really well, in any case I've put the money aside for that now and if they get the right discounted price, I'll probably buy it anyway and any work I do now, if it turns out well, will be useful to have the skill ready to make the SR my main coat, modifying as much as possible to make it the way I want.
I show couple pics of the work-in-progress.

Here, my full k outfit (clothes, bates are in the closet).
The fur is just put over the collar, it's still dismounted, cause I prefer to wait for any waxing process with Otter to be done, before resewing it. It has been dismounted also to preserve it from the very last color tuning I recently did.

IMG_20240425_114744.jpg

As you can see also in direct sunlight, maybe I reached an ever better level of SA of that greenish tone, it looks closer to kinda uncoated SR, but now a bit of shine is recovered, for the last retouch, I hope in otter wax intervention.
I wrote to several wax producers and vendors, everybody discouraged me (as I already well thought) to use again chemicals like acrylic mediums, odicoat, cleopatre etc, and not even acrylic wax, it is a product to be used only by professional with the due knowledge, possibly.
Otter wax is sold to coat indifferently coated or uncoated cotton garments, so trusting what I should be take for sure the most, I'm going to choose it instead of Barbour Thornproof.
Probably Thornproof gives a bit more of structure and sturdiness to withstand scratches etc, even if theorically designed for re-waxing native waxed garments, so maybe it could work fine, but this time I want to go for the less experimental way.
I will let so let open the lining, waiting for waxing it before resewing everything, since that fabric showed me bad reactions with a wax I used time ago, but I can try otter bar (more than fabric dressing) so using heat as less as possible, putting a plastich sheet underneath avoiding the wax to exceed in penetrating the fabric and make its proper layer, even when evening it with the hairdryer.

You can also see that, about the doublestitching line, for both the bottom one and and the longer one, same width (just implemented) = more SA


IMG_20240425_142553.jpg


bottom2.jpeg


bottom.jpg


I honestly don't see all that evidence about the cut I've done now, also on the museum version of the coat, but as said other times, I do tweaks because I see the movie, I like that style, so regardless of the other version I can see, I stay focused on how I interpret it on the movie in the scenes that inspire me the most.
Actually, I had my coat also a bit shorter than perfectly covering "knee-length", so now, it is even shorter on the back, but I like that cut so much that, together with the desire to redo that low edge, I couldn't resist.
Certainly if SR doesn't have it and has an even better margin to create it more accentuated, when and if I have it, I will not fail to seriously consider doing it there too.Thanks again to Mechanismo for having brought this detail for common attention at the time. I still have to finish reseweing and tweaking, but it already show how better it looks with it, even if shorter, imho.
 
Last edited:
however, in the post of that guy above wearing SR, it seems like he heavily shortened his coat. It's too short, really, just about mine now but without the bottom vertical cut.
In many other posts by SR owners, it isn't that short, rather long (and that's what I hope about any SR I could buy, to have room for tweak the bottom possibly)
 
according to what I had already seen in this pic, the collar looks better but when open, the attachment on the right side is still too far forward.

Yes, that is the screen accurate view of things. But just as with the stitches a compromise has to be found and changes are inevitable if you want to translate a costume into more than a cosplay piece. If you want a functional garment the position of the collar makes sense, insofar as a collar on a jacket is there to protect your throat from the elements.

47489342lc.jpg


As you can see, on the SR the collar is designed to close in front of the throat. This centerline is actually relevant for most clothing and for good reason. When it gets stormy your hands close the front of the coat and both sides of the collar are in position to give protection - even with the collar down. And if you secure the front with the hook & eye and the collar with the buckle (it is possible to use it in the down position as well), then you arrive at a configuration that is most useful.

The collar-up-position has been of little to no importance to me for daily wear. People want to see your face, imagine that.
 
Last edited:
however, in the post of that guy above wearing SR, it seems like he heavily shortened his coat. It's too short, really, just about mine now but without the bottom vertical cut.
In many other posts by SR owners, it isn't that short, rather long (and that's what I hope about any SR I could buy, to have room for tweak the bottom possibly)

He seems very muscular with broad shoulders. I am sure he had to size up to get a good fit and then make some adjustments. It seems shorter than usual, true. You can also see an additional hook in different position and there is Velcro attached to the right lapel and the left chest.
 
Yes, that is the screen accurate view of things. But just as with the stitches a compromise has to be found and changes are inevitable if you want to translate a costume into more than a cosplay piece. If you want a functional garment the position of the collar makes sense, insofar as a collar on a jacket is there to protect your throat from the elements.

View attachment 1813504

As you can see, on the SR the collar is designed to close in front of the throat. This centerline is actually relevant for most clothing and for good reason. When it gets stormy your hands close the front of the coat and both sides of the collar are in position to give protection - even with the collar down. And if you secure the front with the hook & eye and the collar with the buckle (it is possible to use it in the down position as well), then you arrive at configuration that is most useful.

The collar-up-position has been of little to no importance to me for daily wear. People want to see your face, imagine that.
Turin in winter is often foggy or otherwise polluted, in many cases, here I don't disdain the more blade runnery configuration of the coat.

Now I will try to create that system I have in mind with the zip for closure, starting right from my bep after I have tweaked some other things but it will be hidden from view, even and above all when open, obviously, but as you will have understood, any way I manage to make for this purpose, I will not concern the collar (I don't see how it could be possible to add a zip that also includes that up to face height, without it being inevitably visible and distorting the nature of the coat).

I say it again, I agree, I consider the SR system to plug that hole in the throat, an excellent solution for various aspects, SA or not
 
He seems very muscular with broad shoulders. I am sure he had to size up to get a good fit and then make some adjustments. It seems shorter than usual, true. You can also see an additional hook in different position and there is Velcro attached to the right lapel and the left chest.
of course, everyone can make the changes they want, I don't necessarily mean criticism in a negative sense, but if I had been able to see when mine was made, and impose a greater width of the collar, as well as a greater length at the bottom (since that although I can manage a little with the tailoring, when the material you have is that, there is little more to do), I would have insisted, of course.
Imho, so short (I don't want to say anything about the rest), the nature of the coat and the type of style, changes a bit.
About the hook, I'm doing a similar adjustment, since I plan to increase the double-breasted width and make it a bit more snug (one the scars I had, it is exactly where the eyelet was placed, maybe also because too many treatments on the fabric, but it has torn off, letting an ugly hole I patched somehow, and dunno if I will do better to mask it when I get Otter wax hoping it to cover a bit more, but that's it...), but about the velcro, stilistically I consider it completely odd, ok functional somehow but I find that it's really too out of place to see so clearly when open, there are more hidden solutions for things like this, however everyone does as they believe, in comparison the various little holes that my current one has, which if it sees a happy ending, could still be included in the list of the most distressed-style replicas, look like small battle scars or wear and tear and are barely visible, that black stripe doesn't seem very stylish to me.

I really hope that if this SR ever come to me, it will be like many of you, just beyond my knee, then this story of customized measurements in online purchasing, I have always viewed it with due skepticism, because a shoulder panel to be redone if it you want to tighten it's a bit of a mess in fact, maybe it's also because I'm a guy who oscillates between 70 and 78kg so often my size isn't too set or I end up putting things away/selling things depending on the period, but still the size, is it correct to adjust it a little yourself, or does it means been lucky if at the first try (and if it lasts).

Anyway, I took a custom size from bep, don't have that much to regret about it, and concerning SR, I won't even ask more to Seann about the length details too, since I already saw it should be as I expect, and they won't do any modification for me anyway, that's clear
 
Last edited:
this is what I mean.
When I received it, I put on bep measurements form 100cm length from neck to back (but it's always difficult to understand if it was the right interpretation, since it's including or not the doublestitched seamlines?) the coat I made by myself 2 years ago, was 113cm, but in time I considered it too long (and then, after regained muscles, impossible to wear again since too tight), but probably could have been perfect for implementing that cut at the bottom, I should have put in the form, at least 110cm), so now the lower middle half is 8 cm shorter, but when I see the pic of that guy with SR so short in the back, I believe he shortened about 15-20cm! at that point he could have considered purchasing their short version (it's different, but that way, a long coat I find it a little distorted) just like I could be told that I could avoid buying the laminate and get the duck canvas, given how it ended in less than a year
 

Attachments

  • IMG_20240426_110715.jpg
    IMG_20240426_110715.jpg
    2.8 MB · Views: 12
Last edited:
I'm sewing back the fur, achilles about the right side of collar open, I think I fixed it.
I'm moving all the magnets, in order to gain a bit more space inside that collar also, caught the chance to implement that collar shape.
I used the double magnets solution (like in your "collar position 2"), moved the upper magnets to the maximum external positioning (hoping them to better hold the closure), added the 2nd one in a lower position, above the buckle, to pull a bit towards right the collar when open (I put one of my strongest neodimium) letting it protrude a bit, and folding a bit lower, protruding a bit also to the bottom

IMG_20240426_193218.jpg
 

Attachments

  • IMG_20240426_185623.jpg
    IMG_20240426_185623.jpg
    3.7 MB · Views: 21
  • IMG_20240426_185521.jpg
    IMG_20240426_185521.jpg
    2.8 MB · Views: 23
  • IMG_20240426_193218.jpg
    IMG_20240426_193218.jpg
    2.7 MB · Views: 20
Last edited:
I bought the magnets online and they are the strongest magnets I've handled so far. Perhaps too strong for my taste.

They keep the coat closed no matter how much I move or run, probably better than any buttons I've ever tried.

My tailor encased each magnet in a fabric pouch that I presume got stitched on the outside (can't see any stitching from the inside).

In my experience, unless they're only 2mm thick, adding layers won't change the strength of their attraction.
Mine are 4mm thick and they can attract each other just fine if I put my hand between them.
View attachment 1673111
Where did you buy the magnets online?
 
ok, rain and winter is coming back and seem to stay for another while, and I've some more time to invest in resurrecting my current coat (dunno if it's still correct to call it bep since I completely twisted and modified it, but I don't want take all the credit for sure, since certail details, for me, wouldn't be possible to replicate I think).
Indoor drone shooting time.

This is what achilles meant as closure not hiddening the face when around, I guess. Got it.
As you can see, I dramatically increased the double-breasted (furthermore, the two waist doublestitching lines did not touch each other, and there had been an inaccuracy in this, since the one with the hook ended lower (they are correct for a single breasted, and they should be as I've done now and the same of your SR looks in pics you posted, so properly asymmetrical and touching each other when closed), now I have taken up the bottom a little and managed everything without deforming anything and making it square as it should), there is still some work to be finished and touch-ups, but the color is still better than the previous ones, reviewing the old photos with the same method in the same room with the same light, I must say that I notice a marked improvement, not I'm more desperate, it's incredible what you can do with a little effort and luck.
The upper magnet on the right chest (as well as all the others, and still some others to be fixed) has been put now at about the same Gosling notorious close-up position, and even if nobody can match movie magic doing everything in one coat, I think my solution about the throat (sewed all, making the lower part of the collar go a bit over the upper edge of the left lapel) is very
similar to that result, and it's still good-looking also when open.
The collar now close perfectly also in face-shield position, I just moved magnets to the very edge as much as possible, and one as been replaced with one of my stronger neodimium. You can see from the back angle that is still pretty tight, but now is wearable.


DJI_0086.MP4_snapshot_01.06_[2024.04.27_15.24.04].jpg


DJI_0086.MP4_snapshot_03.18_[2024.04.27_15.10.16].jpg


DJI_0086.MP4_snapshot_01.53_[2024.04.27_15.07.48].jpg


At this point, except having another coat that could be superior in terms of freshness and high-quality finishes and stitching, I don't even know if it's worth spending on an SR, even discounted.

Together with my new hidden zip method (to be implemented soon), further increasing of the quilting with 150g non-woven (already there, warmer), and a new feature I recently put to the wrist where I create a method to close with push button and elastics inside the cuffs (also hidden from outside) which works great to completely seal to coat in other point where cold winter air can enter, and the restored sturdiness I can expect from waxing, I can definitely say, this time I think without any future second thoughts, that my current coat is perfectly suitable for cold season, the only flaws are the collar (still narrow even if now it closes), the length (a bit short especially on the back where the bottom cut I made starts, but it's still acceptable), and for what concerns things I could have payed more attention, the little scars, but it's nothing so serious as to make it look out of place or no longer wearable, in fact from how I've seen someone here distress his new k coat, perhaps there are those who would like it more like this.

My theory about the PU in the weave was correct, also a bit of shine is naturally recoreved when turning back to a color of brightness more similar to the dark amber that the base is that of PU, like this darker teal grey.
I just think now I'll go for the Otter bars instead of any fabric dressing (like otter one or barbour thornproof):
this particular cloth, I already tested time ago, reacts very bad in applying hot oil-rich wax, especially if not opening the lining before to put a solid sheet underneath (that I will put anyway, waiting to completely close the fur I now resewed, letting a gate for maneuvers at the lining junction) that avoid excessive penetration also on the inner parts, fur etc.

I could plan to sell it in the future, let's see if SR will make an offer I couldn't refuse, and if I get it, if I'll be able to do even better with that.

Here, old pic when it was fresher and more of a clean aspect, but to me it was way too shiny/leather-like and too dark above all, I feel much more of a blade runnery feeling with this final result, just hoping for the wax to give a welcome great final touch.


olds.jpg


t.jpg
 

Attachments

  • DJI_0086.MP4_snapshot_02.04_[2024.04.27_15.08.45].jpg
    DJI_0086.MP4_snapshot_02.04_[2024.04.27_15.08.45].jpg
    58.4 KB · Views: 15
  • DJI_0086.MP4_snapshot_01.06_[2024.04.27_15.24.04].jpg
    DJI_0086.MP4_snapshot_01.06_[2024.04.27_15.24.04].jpg
    75.4 KB · Views: 14
  • DJI_0067.MP4_snapshot_07.45_[2023.12.08_13.58.13].jpg
    DJI_0067.MP4_snapshot_07.45_[2023.12.08_13.58.13].jpg
    124.3 KB · Views: 18
  • DJI_0067.MP4_snapshot_07.45_[2023.12.08_13.58.13].jpg
    DJI_0067.MP4_snapshot_07.45_[2023.12.08_13.58.13].jpg
    124.3 KB · Views: 23
  • IMG_20240427_222804.jpg
    IMG_20240427_222804.jpg
    4.7 MB · Views: 15
  • IMG_20240427_222715.jpg
    IMG_20240427_222715.jpg
    2.4 MB · Views: 16
  • IMG_20240427_222652.jpg
    IMG_20240427_222652.jpg
    3.1 MB · Views: 11
Last edited:
short explanation of the zip closure I wanted.

I attached the system along the joining line between fur and lining, extending it downwards as best as possible.
It acts a bit like the system of coats with internal vest, it prevents any air current from entering from the parts where obviously the magnets, not covering the entire line, cannot prevent them, and when the jacket is opened it simply remains folded inwards, I could make some mini hooks to keep it folded but it doesn't seem necessary as it doesn't add volume (it's simply made of double layer nylon) and when the coat is worn it remains pressed between the body and the lining without moving from there when opened.

The lapels are then closed on top accordingly, and in case of extreme bad weather (for which however I will also have to rely on future waxing, because the residual level of my coating is currently too low even for the intense cold), they hold the position is also better, also aided by the light but effective underlying structure. I will probably remove the old system with the additional hidden internal hook at chest height that I had created, both systems could not be used and in any case it is now outdated and no longer useful.

So that it is effective without creating a mess, I recommend to anyone who might ever draw inspiration from it, to take the measurements when worn carefully, because otherwise it is too tight, it took me more than a while to find the right fit for the situation.

Obviously it is not mandatory to use it, so as usual you can only use magnets, of which I have duly reinforced the capacity of the most crucial ones with nice round neodymium plates of 10kg each, which I invite you to do (or have done) anyone who has problems with the closure holding in this regard.

In any case, if you're in a hurry, the zip method is too practical, comfortable and effective against any weather problem, for something like this not to come to mind.
I'll be adding a snap button soon too, normally I don't like them as wearing the more stylish ones means making permanent holes in the garment and I don't really like options from which there is no return like these, so I'll just put one not far from the eyelet, using the waistline to properly support it without other risk for the fabric in the long term, because as I had shown in previous posts, giving the hook a snake shape solves the problem of the poor sealing effectiveness of the hook n eye system, but in any case if as done by me you increase the padding, you optimize the size by making it tighter etc, you end up putting too much pressure on that eyelet (the main reason why it created a horrible external hole that I had to patch somehow, the damage of that type is more evident and the only really annoying one of all the little holes that have been created over time and due to my too many coloring jobs).

I reinforced the entire area where the eyelet is sewn with an internal buckram strip passing from edge to edge and below along the right waist line, and now it is more secure and I will not remove it, but by affixing a snap button without piercing anything (I preferdd the small and less stylish version only sewn on top) on the waist line which holds without risks, there will be a further touch of practicality which can also avoid the use of the hook n eye, if not to make every style


IMG_20240428_012854.jpg


IMG_20240428_104923.jpg


IMG_20240428_115540.jpg

IMG_20240428_012754.jpg
 

Attachments

  • IMG_20240428_012754.jpg
    IMG_20240428_012754.jpg
    2.6 MB · Views: 5
Last edited:
I'm sewing back the fur, achilles about the right side of collar open, I think I fixed it.
I'm moving all the magnets, in order to gain a bit more space inside that collar also, caught the chance to implement that collar shape.
I used the double magnets solution (like in your "collar position 2"), moved the upper magnets to the maximum external positioning (hoping them to better hold the closure), added the 2nd one in a lower position, above the buckle, to pull a bit towards right the collar when open (I put one of my strongest neodimium) letting it protrude a bit, and folding a bit lower, protruding a bit also to the bottom

View attachment 1813730

Looks good. How far does the upper tip of the right collar hang over? On the revised collar pattern I ended up on 4,5 cm.
 
Looks good. How far does the upper tip of the right collar hang over? On the revised collar pattern I ended up on 4,5 cm.
If you mean how much it protrudes outwards, the margin is slightly variable, as the magnet I added for this purpose is a flat and wide neodymium magnet, the strongest I had (10kg declared force, from professional hardware store anti-rust coated) I encapsulated it in fabric and sewed it to the necessary parts adjacent to the buckle, so being wide, you can pull a little more depending on how much you want to let it out, but with such a short collar 3cm is the maximum.
On the other hand, as I was saying, my collar was too short from the beginning, so I couldn't cut curved or any radical maneuver of that kind, or the result would have simply been to shorten it even more and ruin everything permanently.

Obviously you can also put it almost parallel as it was before, as I simply moved the other magnet a little further outwards (as much as possible) to help me get that narrow collar to hang up again when closed
 
Last edited:
Yeah, that is what close to what I meant. Back on page 104 there is photo of my coat in that position.
I saw that, also others use this configuration, I saw it is also possible (an kinda useful, in certain occasions) to close it with the left lapel further folded matching base and top magnets on the left side, like a turtle-neck style.

Personally I just close it hiddening my face when it's cold/foggy/riding a bike etc, or I open it letting the throat visible and the lapels folded open in the typical shape, but with the body covered by keeping the closure at the waist and also a couple magnets above.
The less used way to wear it, for me, it's completely open like in the movie, except sometimes entering in stores/places where is too much of internal heat and temperature changes so that I want to simply open it all, but it's rare, I got it as a winter coat so, I need it closed featuring its trademark configuration protecting my face (or at least the body) from cold or bad weather.

When just received with very few initial tweaks, I considered this (now almost former) laminate giving a really good impression even darker and shiner than the movie, but in time I become more demanding, and even if it's normal to cover the face here during winter somehow (scarf / hood etc people normally do that), I realised for myself, but also in people around me, that the combination of having his face covered, but with a long coat (I have some waist-length dark jackets and it's not the same problem) and no frills closed, with an austere appearance, and dark and shiny in that way, gave the impression to many, a bit of a "certain individual" Matrix style or 90s movie terrorist/robber style with typical leather trench coat.

By now I no longer believed that I had done anything good (not to mention just great damage) by trying to make do in modifying the tone, but if this is more or less the final result, I can finally be quite happy.

When the time comes, hoping it doesn't make a mess, the wax will give the final verdict on this replica.
In the meantime I'll see what SR does, but I wouldn't be the one to keep two coats in my wardrobe, usually I'm pretty minimalist and synthetic (despite how much I can write here), I could get it if and when at a good price, and do some nice work on it, then figure out which of the two I think is better for me, and sell the other (which in any case, will be a great coat).
It is the most pragmatic plan.
 
Last edited:

Your message may be considered spam for the following reasons:

If you wish to reply despite these issues, check the box below before replying.
Be aware that malicious compliance may result in more severe penalties.
Back
Top