You are using an out of date browser. It may not display this or other websites correctly.
You should upgrade or use an alternative browser.
You should upgrade or use an alternative browser.
ST: Discovery Communicator build
- Thread starter Kokanee
- Start date
sdhlaw1701
Well-Known Member
Great job! You have mad skills.
I'm at a bit of a pause right now as I ordered the wrong screws for the antenna and replacements are on a literal slow-boat from China. So I decided to whip up a display stand for this prop:


Sadly it's winter now here in Alberta, so I won't have the opportunity to paint it up until the spring.
Sadly it's winter now here in Alberta, so I won't have the opportunity to paint it up until the spring.
I love that stand! Very classy.
NakedMoleRat
Legendary Member
Dude, you know I want this, right?
Dude, you know I want this, right?
Print and build one too! Files and complete instructions are up at Communicator from Star Trek: Discovery by mooslug
")
NakedMoleRat
Legendary Member
Print and build one too! Files and complete instructions are up at Communicator from Star Trek: Discovery by mooslug
Awesome. Thank you for your generosity. Now, can someone print one for a good price, or will I have to create a Shapeways account and surrender a paycheck to them?
I'd recommend Shapeways for the lid/antenna piece (fine detail plastic), and buttons/button bar (fine detail, aluminum, or rhodium plated brass), but as Kokanee suggested the rest of it is simple enough to do on an FDM.
Kokanee did you print your pieces in Fine Detail plastic? I see shapeways has added some sort of "Accura" SLA plastic but I'm unfamiliar with it. Hopefully it's nothing like the grey acrylate (form2) they used to offer - that method was completely incapable of making a usable lid piece. Of course the Fine Detail turned out nicely.
Kokanee did you print your pieces in Fine Detail plastic? I see shapeways has added some sort of "Accura" SLA plastic but I'm unfamiliar with it. Hopefully it's nothing like the grey acrylate (form2) they used to offer - that method was completely incapable of making a usable lid piece. Of course the Fine Detail turned out nicely.
NakedMoleRat
Legendary Member
Nice!
Very nice replica!
Just wondering where you got the sound effect?
Admittedly it sounds like the TOS version, but
according to an interview with the sound designers for the show:
"TF: The communicator beep was a doorbell that I recorded in India."
(here is the article)Creating the signature sound of 'Star Trek: Discovery' season 2: | A Sound Effect
This thread has been so helpful! Thank you, all!
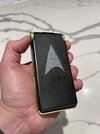
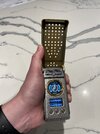
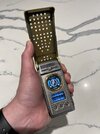
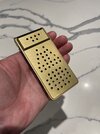
The build I’m sharing here will look familiar to Mgoob as he owns an identical unit. We had our Disco comms professionally built utilizing the fantastic Thingiverse 3D model linked earlier in this thread.
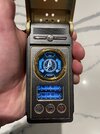
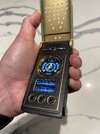
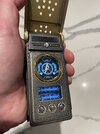
Parts were printed via Shapeways. The main body/antenna parts were printed in “Smoothest Fine Detail Plastic”. We printed the round interior screen bezel in 18kt gold-plated brass and the interior buttons in rhodium-plated brass. This added ~$100 to the parts cost, but I really like the look.
The antenna and interior relief panel were painted if Tamiya TS-21 “Gold”. The body was painted in various layers of Tamiya grays and misted metallics to create a matte metallic look.
The interior perimeter detail of the antenna was lightly airbrushed with dark gray to mimic the screen-used examples we referenced (I assume this was done to somewhat darken the attenna interior to reduce glare / visual distraction in close-up shots…???)
The graphics were purchased from TheCargoHoldDesigns on Etsy. A very thin sheet of glass was placed over the graphics to create a more “screen-like” look.
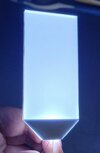
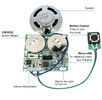
Lighting is provided via a light panel from Adafruit (see pic - currently out of stock, but I’m sure these are available elsewhere).
Sound is provided via an MP3-loadable soundboard purchased via Amazon (see pic): https://www.amazon.com/dp/B0883F8YYS/ref=cm_sw_r_cp_api_glt_fabc_R3Q41TTG3ZJBG09433J3?psc=1
Both of these FX components were wired into a single circuit and modified for activation via a Reed switch.
Mgoob supplied the “chirp” sound, which he captured as an MP3 from a Disco episode. The capture was cleaned up using Audicity for greater fidelity. I’d be happy to send the MP3 file to anyone who’s interested - just message me!
Not a cheap build, but very happy with the final product.
Here’s a video of the unit in action:
The build I’m sharing here will look familiar to Mgoob as he owns an identical unit. We had our Disco comms professionally built utilizing the fantastic Thingiverse 3D model linked earlier in this thread.
Parts were printed via Shapeways. The main body/antenna parts were printed in “Smoothest Fine Detail Plastic”. We printed the round interior screen bezel in 18kt gold-plated brass and the interior buttons in rhodium-plated brass. This added ~$100 to the parts cost, but I really like the look.
The antenna and interior relief panel were painted if Tamiya TS-21 “Gold”. The body was painted in various layers of Tamiya grays and misted metallics to create a matte metallic look.
The interior perimeter detail of the antenna was lightly airbrushed with dark gray to mimic the screen-used examples we referenced (I assume this was done to somewhat darken the attenna interior to reduce glare / visual distraction in close-up shots…???)
The graphics were purchased from TheCargoHoldDesigns on Etsy. A very thin sheet of glass was placed over the graphics to create a more “screen-like” look.
Lighting is provided via a light panel from Adafruit (see pic - currently out of stock, but I’m sure these are available elsewhere).
Sound is provided via an MP3-loadable soundboard purchased via Amazon (see pic): https://www.amazon.com/dp/B0883F8YYS/ref=cm_sw_r_cp_api_glt_fabc_R3Q41TTG3ZJBG09433J3?psc=1
Both of these FX components were wired into a single circuit and modified for activation via a Reed switch.
Mgoob supplied the “chirp” sound, which he captured as an MP3 from a Disco episode. The capture was cleaned up using Audicity for greater fidelity. I’d be happy to send the MP3 file to anyone who’s interested - just message me!
Not a cheap build, but very happy with the final product.
Here’s a video of the unit in action:
Attachments
-
 86EB76F1-0570-4181-BAE4-6EFF0BD8FD95.jpeg1.7 MB · Views: 106
 -
 7BC1DFD9-CC2C-49D7-A7A5-22AED3614967.jpeg1.6 MB · Views: 103
 -
 701CFC32-6691-4DA2-9256-C99F40E666CE.jpeg1.6 MB · Views: 129
 -
 0B159B00-138C-4120-B77C-D4FC2ECA09FF.jpeg1.9 MB · Views: 181
 -
 0BD3F8D0-9355-4345-9544-7A1E66BB527D.jpeg1.5 MB · Views: 98
 -
 ACE05AD2-A7FA-48DA-A199-38B48CCA6B17.jpeg1.6 MB · Views: 93
 -
 31F83DB0-446B-4965-8A16-DCBA94032429.jpeg1.5 MB · Views: 100
 -
 32C08CFB-9AE8-4498-9211-17614B8FE3BD.jpeg415.5 KB · Views: 101
 -
 B0FC71C2-7853-4324-8C72-A055AB345721.jpeg633.6 KB · Views: 107
Last edited:
NakedMoleRat
Legendary Member
Well done.
enterprise0216
Sr Member
Truly fantastic job on it TCbinaFlash superb!!
Similar threads
- Replies
- 20
- Views
- 3,696
- Replies
- 56
- Views
- 14,989
- Replies
- 4
- Views
- 4,653
- Replies
- 13
- Views
- 3,107