You are using an out of date browser. It may not display this or other websites correctly.
You should upgrade or use an alternative browser.
You should upgrade or use an alternative browser.
Arvey Models 1/350th scale EDF (Space Battleship Yamato) warships
- Thread starter mrchester
- Start date


The two "drop tanks" that go underneath got the machinist treatment. I cut the mounting pylons off and drilled the pylons and tank for steel pins. I also drilled new corresponding holes in the underside (digital readout comes in handy for this). With the pylons off, I could true up the tanks in my hobby lathe. Primer and paint... wait for final assembly.


Early paint stages of the tachyon inserts included.
Early paint stages of the tachyon inserts included.
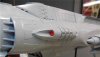
I had gotten real antsy about getting this thing finished (another spot on the Arvey Models page is waiting for this) so here's the final primer photos of this big monster.


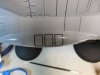
Oops! There was a late discovery of a dip in the flight deck that the putty police missed earlier (missed some other things to be covered later)

Oops! There was a late discovery of a dip in the flight deck that the putty police missed earlier (missed some other things to be covered later)
Last edited:
I finally decide to put some color on this thing...and as before mentioned, I chose Krylon's Pewter Grey as the primary color. I became a master of Krylon back in my rocketry days and the neat thing about it is that it is impervious (somewhat) to enamel reducer. This comes in handy for detail painting (with Testors) and correcting errors that occur. The upper flight deck will be Testor's Gunship Grey and the color bands in Pactra Yellow( this was a mistake).


Last edited:


This is when you know that a list of things to do is a good thing. The side pods have rear details including cones mounted within rings (2 per side). What I forgot about is that the rings had casting issues and its easier to cut and replace (at least for me).

The problem is how to setup a painted model for this operation.


Fortunately, I made a rather robust stand for this model (more on that later) and just set it on one of our horizontal boring mills (the one with digital readout). I creatively set up a machinist's vise , using a shop rag to protect the finish, to clamp the rear of the model. After finding the center, each ring was drilled to 3/16" and then countersunk with a 7/16" endmill.


Unfortunately, I managed to dislodge one of the flight deck ramps... must make a new one. Had to do that with the Bandai model , too.
The problem is how to setup a painted model for this operation.
Fortunately, I made a rather robust stand for this model (more on that later) and just set it on one of our horizontal boring mills (the one with digital readout). I creatively set up a machinist's vise , using a shop rag to protect the finish, to clamp the rear of the model. After finding the center, each ring was drilled to 3/16" and then countersunk with a 7/16" endmill.
Unfortunately, I managed to dislodge one of the flight deck ramps... must make a new one. Had to do that with the Bandai model , too.
Last edited:
Here's what the reworked tail cones and their inserts look like in aluminum. A 3/16" piece of brass tube aligns the cones in the inserts.


Here's some shots of the light strip that will be put in the soon to be constructed landing bay.


And here's some in the dark garage (these really pissed off my camera).


Here's some shots of the light strip that will be put in the soon to be constructed landing bay.
And here's some in the dark garage (these really pissed off my camera).
Thanks for the input, Treadwell. Check out my other big (currently stalled) project under the heading MPC Cygnus. Insanity at its best.
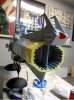
I had to put the beasty back in the horizontal mill to open up the battery/switch bay. The simplest thing to do was to cut the back out of the Wave Engine exhaust nozzle and put in a loose backing plate that can be used to turn on and off the hangar lights. Pictured is the finished push on/ push off switch mount and the nine volt battery with an extraction tab that I glued on. The nozzle will be removable for battery changes.


I had to put the beasty back in the horizontal mill to open up the battery/switch bay. The simplest thing to do was to cut the back out of the Wave Engine exhaust nozzle and put in a loose backing plate that can be used to turn on and off the hangar lights. Pictured is the finished push on/ push off switch mount and the nine volt battery with an extraction tab that I glued on. The nozzle will be removable for battery changes.
Okay, I put in six hours straight today and I'm paying the penalty for it (as I approach 50, I've noticed that summer allergy season really screws with me). I did get a major task done ...fabricating the landing deck/bay. To hide the LED strip and add some interest, I had to make a drop ceiling. I had neglected to put in the filler piece from Arvey, which bought me the space I needed for the wiring. I also incorporated some Plastruct lattice girder work around the perimeter of the ceiling panel. I drilled three holes for the LED's to shine through then primed the assembly in grey. Using some Evergreen sheet plastic siding, I fashioned a roll-up door that would lead to the (theoretical) internal hangar deck. On either side of the door there is a piece of girder to set the ceiling height over the door. I painted the roll-up door silver.


I also got around to making the replacement landing deck. This was made for two pieces of 1/16" sheet plastic ( sandwiched to make it 1/8" thick) then a bevel was hand filed on the rear end (no pictures now). I brushed the exposed walls of the bay in Intermediate Blue and will let it all set over night. I will have to be creative because that pesky twist the I solved on the outside of the hangar part (through extreme milling) still exists inside the hangar cavity.
Oh, here's a couple of extra pictures of the hangar ceiling.


Oh, here's a couple of extra pictures of the hangar ceiling.
Okay, I jumped on the grenade and installed the landing bay ceiling/back wall. The floor panel is still removable (which makes it easy to apply any markings and mount the fighter planes) and locks in under the roll-up door girders. I placed one of the resin Cosmo Tiger fighters in the bay for scale. Next, finish dressing up the rear of the ship. Enjoy the pictures.


I'll agree, vismus. The Space Battleship Yamato series stands out for the ship design (considering that it originated in the mid-70's and that the stuff still holds today). Leiji Motsimoto's concepts are simply wonderful.
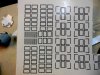
I've gotten to the final paint job. I changed the yellow to Krylon's Bright Idea and the flight decks to Krylon's Smoke Grey. After everything was dry, I had to address some surface detail that I opted to fill in. The six doors on the side blisters got damaged on one side and I opted to fill them in on both sides. I wanted to try something different... I made up decals in my trusty Paint program. The corner rectangles had their corners separated so that their placement on a multi-curved would be easier.
I also used nylon washers (painted orange) in the front and rear of the blisters. This added interest and help me get by the pesky issue of my inability to detail hand paint with a brush.
Attachments
Last edited:
Before I get to the finished model, I'd like to do a plug (to quote Hitchcock...And now a word from our sponsors.) I have found a couple of primer products that I've used for quite a while. For resin kits, Dupli-colors Self- Etching primer works very well for a first couple of coats. Meant for metals , I've found that for those pesky resin parts that (even after multiple cleanings and prep sanding) are stubborn to take paint. For general build-up work, Plasti-Kote's sanding primer rules supreme. It can be found at certain auto parts houses and comes in Grey, Brown. White, and Black.

I wondered that myself, Splat. My other (currently stalled) project (see MPC Cygnus) got a lot of feedback. I can only guess that this is a fickle bunch or that I could have done better at documentation. There are six more Yamato related kits from Arvey, so hopefully it will chum in the comments.
Finished photos of the Lexington class battlecarrier will be posted this weekend. Thanks for the kind words.
Finished photos of the Lexington class battlecarrier will be posted this weekend. Thanks for the kind words.