Golden Snitch wings (Harry Potter)

TDP - That is so cool!:thumbsup

I've re-watched your other video twice and made copious notes. When you get a moment, could you please elaborate a little more on what you refer to as "half etching"? Seems to me once the metal is placed in the etchant, it's just going to "eat" all the way through. Is half etching how the RPF logos in the video are made? Also, does this process work equally as well on say aluminum, sterling, stainless or pewter? ...and, I seem to remember Hydrogen Peroxide is available in two strengths - like 3% and 30% - which is used for etching?

Thanks - ATL
 
Last edited:
TDP - That is so cool!

Thanks.

I've re-watched your other video twice and made copious notes.

That spells trouble.

When you get a moment, could you please elaborate a little more on what you refer to as "half etching"?

Half etching is the process where you only etch part way through the metal. It can be used for names or logos or to make what is essentially perforation lines to aid in bending the piece to the desired shape. If you think of the design of a square box layed flat, it looks like a cross. If you were to print that on paper, you'd have dotted lines indicating where to fold to make the box. With a half etch, the lines are etched into the metal making folding the box into shape easier.

Seems to me once the metal is placed in the entchant, it's just going to "eat" all the way through.

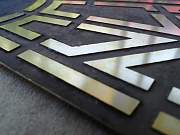
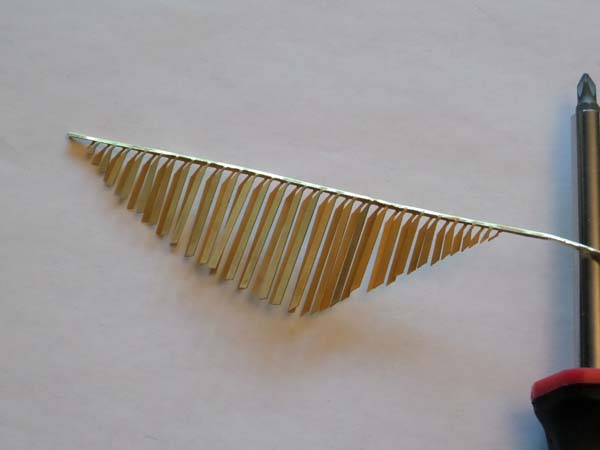
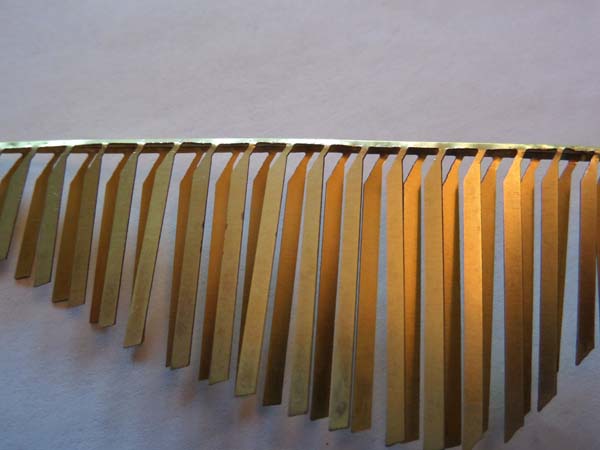
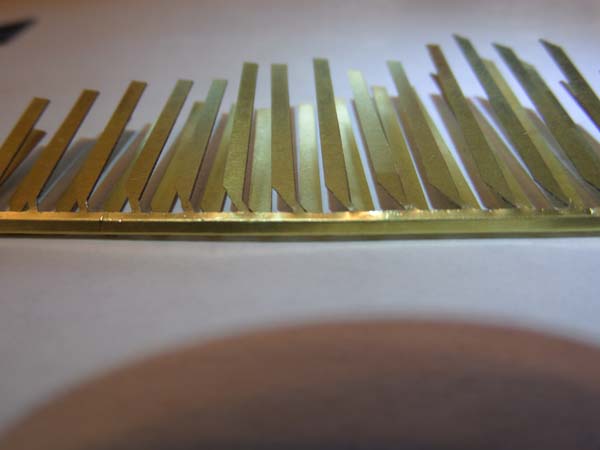
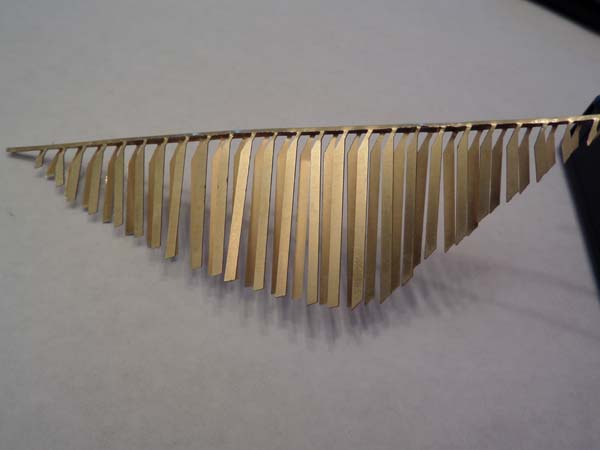
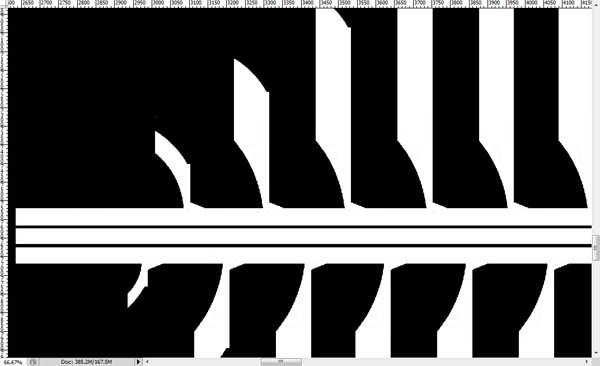
Yes, but that's where the artwork comes into play. Every piece has a top and a bottom. The artwork will be different on the top and bottom to accomidate for anything that you only want to etch on one side. If you look at post 15, there's the outer line where the feather is, then 2 perforation lines, then the bottom line with the other set of wings. This would be considered the bottom of the piece, as that would be a perforation line. The top piece of artwork is the same piece of artwork minus those perforation lines. That allows the solution to etch one side, and not the other.

Is half etching how the RPF logos in the video are made?

It is. If you look closely at the art you will see that the top and bottom are different in some areas. Where they are both black, there will be a hole. Where one is black and one is white, that's where your half etch will be.

Also, does this process work equally as well on say aluminum, sterling, stainless or pewter?

Yes but with some words of caution, and warning, and maybe :)

This process is for sheet metal. It doesn't work for things that are round, bumpy, or fill in the blank of anything not flat. It also works best on things that you can fit through a laminator. That usually means .064" and thinner. That also depends on the type of laminator you have. Thicker stuff can be made, but it's more prone to errors.

Now on to the words of caution and warning. Just because you can etch something doesn't mean you should. Using peroxide and acid works really well and quickly for brass, but has frightening results in aluminum. It bubbles out of control, produces wild amounts of heat, and produces chlorine gas - fume hood needed!

Stainless works well, and I've not tried with the other metals, althought acid eats through them all, it's the reaction that's important. I'm sure Google will tell you the reaction of peroxide, acid, and selected metal.

[I seem to remember Hydrogen Peroxide is available in two strengths - like 3% and 30% - which is used for etching?

Most that you'll find in the grocery store is 3%, and that is what's recommended to use. There are lots of reasons for this. The higher percentage of peroxide, the faster the etching will be done. Faster usually means 2 things. The first is that it will bubble out of control in a frightening manner. Whatever container you thought was big enough because it worked with 3%, will be too small and not deep enough for 15%, and it will get everywhere. The other thing is heat. Etching causes heat. Etching faster causes more heat and if for some reason you decided to etch in a crappy oldglass bowl, the heat from faster etching (or aluminum etching) will likely break the glass leaving your workspace and floor in an unhappy position. Always etch in palstic. And some resists just aren't meant to handle lots of heat. They can bubble and make pinholes in the resist and actually etch that which you don't want etched.

Here's a video of someone etching a circuit board with 30% peroxide. Watch it all the way through and keep the sound on...

https://www.youtube.com/watch?v=OTGZcY7WyYI

That’s just thin copper that isn’t submerged. Imagine what would happen if you put a whole sheet in there. The reaction in the video is the same reaction when etching aluminum with 3% peroxide.

I hope I answered your questions. I tend to be wordy and I'm not always sure that I stay on topic, but I think I did here.
 
I hope I answered your questions. I tend to be wordy and I'm not always sure that I stay on topic, but I think I did here.

Your detailed explanations are most appreciated!

The RPF logo shown about 4 seconds into your video has a two tone metal appearance. If it's not a trade secret :), was this the result of using tin plated brass or did you highlight the raised area using a secondary finish?

Although I don't have a laminator (or access to one), I believe I'm going to try etching a pair of wings using the pewter sheet I have.

4 Shapeways snitch.jpg

As mentioned previously, I need the body to be very smooth for the gold leaf. Member Kevin Gossett has recently posted a thread regarding the use of Smooth-On's XTC-3D print coating. This product looks to be exactly what I needed so I ordered the kit last Friday and received it yesterday. Hopefully I'll find some time to try it soon.

ATL
 
Last edited:
The RPF logo shown about 4 seconds into your video has a two tone metal appearance. If it's not a trade secret :), was this the result of using tin plated brass or did you highlight the raised area using a secondary finish?

The picture at the 4 second mark was the result of pure laziness :) The blue on the edges and such is the resist film that has yet to be taken off. It is rather easy when using brass to tarnish or blacken the half etched parts before taking off the resist, leaving the brass shiny... Looking for a picture...

blackened.jpg


All that's done in this picture is using ammonia fumes to tarnish. Brass Black can also be used. Then just strip off the remaining resist, the tarnish/blackness remains, coat with lacquer to bring out the pretty. It's millions of times easier to age the half etched areas and leave the raised areas unaffected, rather than the other way around.

I've been playing with the wings and have a small update. While they weren't correctly etched, I figured I needed to try and get them bent at some point in time. The first wing was a total disaster, and no pictures of that abomination will ever exist. However I learned a ton from that try and went on for try #2. I scored the existing half etch lines with an x-acto knife and bent the pieces into shape (apologies for the bad lighting)...

snitch wing 6.jpg

snitch wing 7.jpg

snitch wing 8.jpg

snitch wing 9.jpg


It's a little rough, but it's not a bad start. I used some tools that I shouldn't have, and I made a tool that I should have. I'll be making a different tool for next time so I don't use the wrong tool again :) I should get back on the artwork likely Friday.

Although I don't have a laminator (or access to one), I believe I'm going to try etching a pair of wings using the pewter sheet I have.

It's really important to have the right one for what you're doing. Not all laminators can handle all thicknesses, and many have to be jimmied (sp?) with to get the right temperature.

Smooth-On's XTC-3D print coating. This product looks to be exactly what I needed so I ordered the kit last Friday and received it yesterday. Hopefully I'll have find some time soon to try it.

At first glance, it looks like a fast(er) curing epoxy resin. Hopefully it works!
 
LOVING this thread and what you're doing with those wings! It's a shame that a good and faithful replica of the snitch doesn't exist (yet!).
I'd like to contribute "my two cents" to the topic. I have two things to comment that I think haven't been brought up yet:

1. It looks to me the shape of the "rib" might not be straight but curved - at least in some of the props. Let's see if the image loads...
Golden Snitch Wings Shape.jpg
2. The ends of the feathers don't seem straight either. In the photos I've found there's a subtle shape that reminds me of a heel. Let's see if somebody's able to see what I mean in these pics...
Golden Snitch Heel Shape.jpg

That's pretty much it :) Hope this helps!
 
Last edited:
Kabeiroi, glad you joined in the fun!

Please excuse my quick and brutal butchering of your picture :) I absolutely agree that the tips of the wings and the insertion points of the wings to the ribs need to be changed. The red areas in the butchered picture show me that there's light hitting the metal differently in those areas. To me it would suggest a straight line on a different angle instead of a rounded rib. If the consensus ends up being a round rib, then I'll figure out how to bend it like that. But from what I'm seeing in the picture(s), I gotta go with lines.

Golden%20Snitch%20Heel%20Shape.jpg

I may not have mentioned it - yes I did - I didn't correctly develop the last piece(s), so I resorted to an x-acto knife. That caused the abrupt lines in the rib. That will not be the case in the next version because I will be doing my job correctly :) Then we can see how it looks with the angles, and such,and there may be a third and a fourth version.
 
TheDarkPope, I think you're right. I was referring to the other image I attached, but in these it's clear the rib is straight, and then "bent" to create that curvy effect. The other image's effect might be due to the position of the camera.
 
Last edited by a moderator:
http://thedarkpope.com/photos/leviathan/blackened.jpg

All that's done in this picture is using ammonia fumes to tarnish. Brass Black can also be used. Then just strip off the remaining resist, the tarnish/blackness remains, coat with lacquer to bring out the pretty. It's millions of times easier to age the half etched areas and leave the raised areas unaffected, rather than the other way around.

Actually I was wondering how that particular piece was finished, but I figured I already had asked too many questions! :)

I thought folding the metal over was going to be the tricky part. Glad you're taking on that challenge!

LOVING this thread and what you're doing with those wings! It's a shame that a good and faithful replica of the snitch doesn't exist (yet!).
I'd like to contribute "my two cents" to the topic. I have two things to comment that I think haven't been brought up yet:

1. It looks to me the shape of the "rib" might not be straight but curved - at least in some of the props. Let's see if the image loads...

2. The ends of the feathers don't seem straight either. In the photos I've found there's a subtle shape that reminds me of a heel. Let's see if somebody's able to see what I mean in these pics...

Kabeiroi - I agree that it'd be nice if there already was a faithful replica, but given the way prop wings are made, I can't imagine how it could ever be packaged and shipped without some damage to it.

I also think the overall wing is curved and plan to do so on mine (as you later mentioned) after they're attached to the body.

The feather tips do have a heel like appearance to me too. TheDarkPope is doing excellent work with the artwork image I posted but due to the pixellation going from a DWG file to a JPG a lot of resolution was lost. Here's a higher res image:
higher resolution - wing.PNG

ATL
 
Ok, I redid the artwork, and have a new version. I redid the wing tips, insertion points to the rib, centered and added 2 pixels of "beef" to the rib lines. What do you think?

snitch%20wing%2010.jpg


As far as damaging the wings during shipping, the ones that I made are remarkably sturdy. Some well placed bubble wrap should do the trick without a whole lot of issue.
 
Ok, I redid the artwork, and have a new version. I redid the wing tips, insertion points to the rib, centered and added 2 pixels of "beef" to the rib lines. What do you think?


As far as damaging the wings during shipping, the ones that I made are remarkably sturdy. Some well placed bubble wrap should do the trick without a whole lot of issue.

I think that atrwork looks great :thumbsup - can't wait to see the final results!

I know a lot of the CGI representations of the Snitch wings are gold in color, of which polished brass makes an excellent replica. However, I believe that JK's vision was that the wings are silver in color. Just curious, do you have means to plate the brass - either chrome, nickel, silver, tin or pewter?

ATL
 
Thanks ATL.

I can't plate brass, however I can use tin coated metal instead of brass. That''s readily available. I'll make this next set of wings out of that. Should be Friday when I have the next attempt done. It could be sooner, but it likely won't :)
 
I don't mean to be too picky (@TheDarkPope, you're doing an incredible job!) but I'd say the heel shape should be a bit more accused. In the artwork posted here it looks almost too subtle. Apart from that, I'd say you nailed the overall look! :)
 
Definitely awesome work TheDarkPope. I've been watching from the beginning and trying to figure out how I could replicate your work for my own display snitch (I'd love one with those wings in my display case). Any chance you'll sell these when you've perfected it? If not I'm going to have to try duplicating this with only a dremel.
 
Thank you all for your help! Here's my plan at this time...

I'm going to make the set of wings in their current state Friday(ish). I fully expect to make some revisions after that because I'm not sure about the flat part of the wing tip (thickness), and will likely have to redo that. I'll take some pictures at the same angle as the high res Snitch to post so we can compare notes as to what does or doesn't need changing.

It seems as though there's some interest growing in people wanting wings of their own. I've talked it over with the OP - as it is his design that all this is based from - and there will be an interest thread made in the next day or so. I don't currently have a price in mind and that's why it will be posted in the next day or so. They can easily be made from brass or a tin coated steel. I'll go into all that in the thread.

Now I need to get my premium membership on!


Just what I wanted to hear! Very interested in a set of these....
 
Thank you all for your help! Here's my plan at this time...

I'm going to make the set of wings in their current state Friday(ish). I fully expect to make some revisions after that because I'm not sure about the flat part of the wing tip (thickness), and will likely have to redo that. I'll take some pictures at the same angle as the high res Snitch to post so we can compare notes as to what does or doesn't need changing.

It seems as though there's some interest growing in people wanting wings of their own. I've talked it over with the OP - as it is his design that all this is based from - and there will be an interest thread made in the next day or so. I don't currently have a price in mind and that's why it will be posted in the next day or so. They can easily be made from brass or a tin coated steel. I'll go into all that in the thread.

Now I need to get my premium membership on!

TDP - Thanks for your consideration of making the Snitch wings for other members. I just don't have the time to do so.

I know you've generated your own artwork, but if it's a close copy of what's shown in post 7, then I need to point out that the 7th feather from the right on the top row is ever so slightly short. I believe the end needs to more inline with the two adjacent feathers. Not sure how that happened :confused.

I believe I've worked out how I'm going to attach the Snitch wings to the body. If it works the way I think, the wings may be detachable. If anyone else has ideas though , please feel free to present them here.

ATL
 
This thread is more than 5 years old.

Your message may be considered spam for the following reasons:

  1. This thread hasn't been active in some time. A new post in this thread might not contribute constructively to this discussion after so long.
If you wish to reply despite these issues, check the box below before replying.
Be aware that malicious compliance may result in more severe penalties.
Back
Top