Tanhauser
New Member
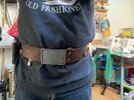
Finally. It's finished!
Over the last little while I've been busy working on a Luke's ROTJ belt replica, a project that started a few months ago in a bid to complete an iconic costume replica.

Where to begin? Other than with an excuse to watch the OT again... as 'research'.
Common theories I've seen have suggested that the ROTJ belt was re-purposed and re-dyed from ESB, but upon close inspection, I'm not so sure. The hardware on the ESB belts shifts throughout the movie, but can be tracked with close inspection.

Originally, the lightsaber hook and D-ring appear close together - towards the tail of the belt, separated by the first belt notch - allowing the belt to be worn over the thicker Hoth fabrics on the third notch. For the Bespin hallway scenes, however, the lightsaber hook moves outside the D-rings, and the belt tightens to the first notch. Onto the Bespin duel and Dagobah scenes, the D-ring moves this time, outside the newly placed lightsaber hook, and this is how the belt would remain for later exhibitions. The 'scars' of the rivets original holes can still be seen however, both in set pictures (3a), and exhibitions (3b). While there likely will have been multiple filming props, this evolution seems to be consistent for all.

None of these 'scars' are visible on the ROTJ belts, and the hardware doesn't quite seem to match any of the positions seen in the ESB belt evolution. Meaning... brand new belts!

While often appearing black, several shots show the belt to be its burnt-umber colour, breaking up Luke's iconic ROTJ black. From exhibition photos too, it's clear that the belt began life in a fudge brown colour, and was over-dyed to achieve the weathered, near-black finish. The flesh-side of the belt has, to my knowledge, never been shown, so determining the colour takes a little more guess work! The way the black has faded and weathered in later exhibition photos, however, would seem to suggest the belt was only surface-dyed, perhaps with the edges and flesh-side remaining the lighter brown.

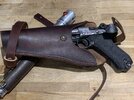
Unlike the belt itself, the single pouch may well have been a re-purposed ESB prop. The shape remains identical, and display photos exhibit the familiar over-dying evidence as the belt itself.
The buckle front is fairly self-explanatory; steel, coated black and weathered, with some noticeable scratches present on one of the filming props. The buckle is then fastened to the belt with line-24 snaps, allowing for easy removal. But with the back of the buckle never seen, a little more interpretation is required. It's clear that Luke's ESB buckles used a square D-Ring mechanism to attach them, and display photos seem to back this up for the ROTJ props too. A simple ring-and-hook fixing makes sense, but due to the thickness of the looped leather, this would stop the buckle lying flat. It's clear then that the underside was raised slightly on the left to achieve a front facing buckle. For the replica, then, some creativity was needed.

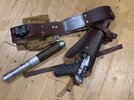
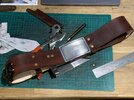
Starting with the pouch, the vegetable tanned leather was dyed to the fudge-brown under-shade, cut, and wet moulded to shape. Tabs were tucked, glued, and double-cap-riveted into place. The stitching lines were then marked, punched, then the two pattern pieces glued and sewn! Finished off with line-24-snaps, some light edge-burnishing and over-dyed to match the screen-used prop.

The belt itself is much the same. Cut, dyed brown, hardware-holes punched, burnished and finished with the black top-coat.

The hardware was crafted from galvanised steel; the lightsaber clip cut by hand, polished, and pop-riveted into place. Alongside it, the D-ring, enclosed in a double-cap-riveted leather loop. The buckle itself was a far more time consuming affair. The fasting mechanism went through several revisions, until I was finally happy with the result. The square D-ring sits nicely, the prong allows the buckle to line up accurately with the belt notches, and is slightly raised to stop any unwanted tilt! Several coats of black paint was smudged, sanded, stippled and wiped to best achieve the dirty weathered look. And some screen matched scratches to finish!

Thank you all for taking the time to read my first post! Now, time to finish the rest of the batch!
Over the last little while I've been busy working on a Luke's ROTJ belt replica, a project that started a few months ago in a bid to complete an iconic costume replica.
Where to begin? Other than with an excuse to watch the OT again... as 'research'.
Common theories I've seen have suggested that the ROTJ belt was re-purposed and re-dyed from ESB, but upon close inspection, I'm not so sure. The hardware on the ESB belts shifts throughout the movie, but can be tracked with close inspection.
Originally, the lightsaber hook and D-ring appear close together - towards the tail of the belt, separated by the first belt notch - allowing the belt to be worn over the thicker Hoth fabrics on the third notch. For the Bespin hallway scenes, however, the lightsaber hook moves outside the D-rings, and the belt tightens to the first notch. Onto the Bespin duel and Dagobah scenes, the D-ring moves this time, outside the newly placed lightsaber hook, and this is how the belt would remain for later exhibitions. The 'scars' of the rivets original holes can still be seen however, both in set pictures (3a), and exhibitions (3b). While there likely will have been multiple filming props, this evolution seems to be consistent for all.
None of these 'scars' are visible on the ROTJ belts, and the hardware doesn't quite seem to match any of the positions seen in the ESB belt evolution. Meaning... brand new belts!
While often appearing black, several shots show the belt to be its burnt-umber colour, breaking up Luke's iconic ROTJ black. From exhibition photos too, it's clear that the belt began life in a fudge brown colour, and was over-dyed to achieve the weathered, near-black finish. The flesh-side of the belt has, to my knowledge, never been shown, so determining the colour takes a little more guess work! The way the black has faded and weathered in later exhibition photos, however, would seem to suggest the belt was only surface-dyed, perhaps with the edges and flesh-side remaining the lighter brown.
Unlike the belt itself, the single pouch may well have been a re-purposed ESB prop. The shape remains identical, and display photos exhibit the familiar over-dying evidence as the belt itself.
The buckle front is fairly self-explanatory; steel, coated black and weathered, with some noticeable scratches present on one of the filming props. The buckle is then fastened to the belt with line-24 snaps, allowing for easy removal. But with the back of the buckle never seen, a little more interpretation is required. It's clear that Luke's ESB buckles used a square D-Ring mechanism to attach them, and display photos seem to back this up for the ROTJ props too. A simple ring-and-hook fixing makes sense, but due to the thickness of the looped leather, this would stop the buckle lying flat. It's clear then that the underside was raised slightly on the left to achieve a front facing buckle. For the replica, then, some creativity was needed.
Starting with the pouch, the vegetable tanned leather was dyed to the fudge-brown under-shade, cut, and wet moulded to shape. Tabs were tucked, glued, and double-cap-riveted into place. The stitching lines were then marked, punched, then the two pattern pieces glued and sewn! Finished off with line-24-snaps, some light edge-burnishing and over-dyed to match the screen-used prop.
The belt itself is much the same. Cut, dyed brown, hardware-holes punched, burnished and finished with the black top-coat.
The hardware was crafted from galvanised steel; the lightsaber clip cut by hand, polished, and pop-riveted into place. Alongside it, the D-ring, enclosed in a double-cap-riveted leather loop. The buckle itself was a far more time consuming affair. The fasting mechanism went through several revisions, until I was finally happy with the result. The square D-ring sits nicely, the prong allows the buckle to line up accurately with the belt notches, and is slightly raised to stop any unwanted tilt! Several coats of black paint was smudged, sanded, stippled and wiped to best achieve the dirty weathered look. And some screen matched scratches to finish!
Thank you all for taking the time to read my first post! Now, time to finish the rest of the batch!