New Martian helmet model and build

I actually cut those parts out of the main print and had them printed in an resin printer, then made a slurry of acetone and talc to glue and hide the seam. Worked really good.

That will be the best approach. Although I may give it a try with a 0.2 mm nozzle and printing the text inserts horizontal with 0.04mm layer height as I don't have access to an SLA printer.
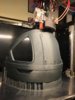
 
The new printer I build based on the railcore II design is doing fantastic on the details. Crisp corners, good layers even at 60mm/sec. (PETG 0.15mm layer height, 0.4mm brass nozzle on a E3D Titan Aero with copper vulcano heat block. That will cut down on print and building time. But the text will need to be cut out and replaced with better detailed prints as anticipated.
 

Attachments

  • IMG_2447.jpg
    IMG_2447.jpg
    427.1 KB · Views: 363
  • IMG_2448.jpg
    IMG_2448.jpg
    493.3 KB · Views: 365
  • IMG_2450.jpg
    IMG_2450.jpg
    587.9 KB · Views: 342
Looks great, really interesting to your take on this build. I'm actually building a second one as a commission at this moment. trying real hard not to redo all the mistakes I made the first round.
 

Attachments

  • IMG-7416.JPG
    IMG-7416.JPG
    1.7 MB · Views: 312
Test fitting the first version. 1 kg of PETG. Very solid, but I need to bring down the weight. This model is a lot of working hours for sure if you build for someone else. I always build two of more complicated projects at the same time.
 

Attachments

  • IMG_2474.jpg
    IMG_2474.jpg
    510.8 KB · Views: 386
  • IMG_2472.jpg
    IMG_2472.jpg
    510.2 KB · Views: 390
Mine weighs in at roughly 1000g as well raw print. Two at the same time seems like a good strategy. I've actually asked for 6months for finishing this build since I'm unable to work more than a couple of hours per week due to me being a parent to a soon to be 2 year old ;) Anyway, the build is coming along nicely so i'll likely finish before the deadline.
 
Awfully nice that you build one for someone else. I hope they appreciate the amount of work that goes into something like this if it is well done. And your build looks fantastic. I like to build things for fun and to relax. My experiences with commissions are pretty dismo as many are only enthusiastic until the next movie comes out and then they realize that they indeed have to pay up to get the prop.
From experience 1kg is pretty heavy to have on for more than an hour. And strained neck muscles are a pain. Do you have more images of the head harness inside? The helmet will have to be fixed securely to the head.
 
I designed a locking mechanism for the neck collar that actually works.
 

Attachments

  • IMG_2478.jpg
    IMG_2478.jpg
    648.8 KB · Views: 347
  • IMG_2479.jpg
    IMG_2479.jpg
    651.4 KB · Views: 335
I love it, Looks great! The reason why I did not is because I was hesitant that the printed levers would take the strain or break after a while when used(I print with a mix of PLA/PETG).
Also, I actually have not incorporated a head harness yet in my helmet(I don't cosplay) but I do have a vague plan on how to attach one.
 
Works great, key is to have a tight fit. I use PETG. If it is not resilient enough I will use carbon fiber PETG that I use for structural designs. Unbreakable, it will only bend under force.
 

Attachments

  • IMG_2483b.jpg
    IMG_2483b.jpg
    200.8 KB · Views: 331
  • IMG_2483b.jpg
    IMG_2483b.jpg
    200.8 KB · Views: 315
  • IMG_2481.jpg
    IMG_2481.jpg
    712.9 KB · Views: 332
  • IMG_2486.jpg
    IMG_2486.jpg
    667 KB · Views: 316
Figured out a good harness to secure the helmet to the head. Not sure how close this is to the original but this will work nicely.
 

Attachments

  • IMG_2516.jpg
    IMG_2516.jpg
    586.1 KB · Views: 381
  • IMG_2517.jpg
    IMG_2517.jpg
    432.7 KB · Views: 395
  • IMG_2518.jpg
    IMG_2518.jpg
    464.6 KB · Views: 364
Just throwing it out there: if you need those text bits printed in resin and don't have your own printer, I'd be happy to print them for you for the cost of resin (a few bucks) plus shipping.
Looking forward to seeing the rest of your build process! Building Kiwimaddog's design was definitely one of my favorite projects I've ever done :)
 
One option I have seen anyone mention for the visor / dome is to make your buck by your favorite method and gravity form it. We use a similar method for the plexi hood for our Greased Lightning cars, race car windows and a few other elements. I know guys who make their Batmobile windscreens this way as well.
 
Just throwing it out there: if you need those text bits printed in resin and don't have your own printer, I'd be happy to print them for you for the cost of resin (a few bucks) plus shipping.
Looking forward to seeing the rest of your build process! Building Kiwimaddog's design was definitely one of my favorite projects I've ever done :)

Thank you so much for the offer but I think I will be able to print these with a 0.2mm nozzle. Need to work on the Chinese characters and print in PLA. This is PETG at 0.05mm layer height but PETG isn't that good for printing fine detail.
 

Attachments

  • IMG_2553b.jpg
    IMG_2553b.jpg
    600.8 KB · Views: 285
One option I have seen anyone mention for the visor / dome is to make your buck by your favorite method and gravity form it. We use a similar method for the plexi hood for our Greased Lightning cars, race car windows and a few other elements. I know guys who make their Batmobile windscreens this way as well.

Right now I favor a negative buck and vacuum to pull heated PETG sheets into it. Not sure what you mean by gravity form? Pushing the buck into the heated sheet?
 
I'd say casting such a big piece is mighty tricky. I was wondering, did you end up with a negative draft angle on the area where the "ears" are on your dome? I might mention that I have a guy making the buck for mine at this moment(though he has run in to some issues with non hardening silicone) and the buck itself for the big dome-piece is pretty complex since it needs an inner core and a outer skin of silicone(at least on my build).
Great work by the way

How big are the sheets for vacuum forming the domes? I am thinking of using 3mm PETG but seems very difficult to source for a decent price.
 
How big are the sheets for vacuum forming the domes? I am thinking of using 3mm PETG but seems very difficult to source for a decent price.
Not entirely sure but I know that my guy buys them in bulk so I'm guessing pretty big, like a couple of meters x meters. There will be several domes formed on 1 sheet but since this is yet to be done(still waiting, maybe this week was the estimate last I spoke to he who will do the forming, fingers crossed). I designed mine for 3mm thickness so we might use a 5mm PETG just to keep the thickness around the cut edge somewhere close to that after forming. It's an expensive job though, multiples of the rest of the helmet combined no doubt.
 
That sounds expensive indeed. I am lucky if I get one success in five trials. 5mm is wicked difficult to heat thoroughly from what I gather. Must be a good setup. If you are there take some pictures.
 

Your message may be considered spam for the following reasons:

If you wish to reply despite these issues, check the box below before replying.
Be aware that malicious compliance may result in more severe penalties.
Back
Top