The Ewan’s Favorite neck is a thing of beautyThank you! The idea is to make something that would function well as a real weapon. It’s primarily meant to be used one handed, with the balance point at the choke. So it’s based on the “Ewan’s Favorite Lightsaber” hilt which is near perfect in this regard.
Then I added two Maul-style silver buttons are at the bottom end. Added the shield around them, and placed them far from the hand grip, to avoid accidents presses. Then I added some prequel style grips and grooves, and there it is!
You are using an out of date browser. It may not display this or other websites correctly.
You should upgrade or use an alternative browser.
You should upgrade or use an alternative browser.
Show your custom Lightsabers!
- Thread starter GreenCircleCube
- Start date
-
- Tags
- custom highrepublic lightsaber
Good morning !!
Well… wanting to take a break on some other projects, I decided to wire up boards and make a couple of interesting sabers..
The first one was inspired by one of Brads builds (slothfurnace ) .. I wanted a saber that I could play with and ( I thought ) was unique enough. Going through his website all the time for clamp cards , I came across his “Derelict” which just immediately grabbed me and inspired me to make one. Well sort of. I didn’t want to flat out copy it but rather use it as inspiration to make it my own but heavily inspired by. ( somehow I found out that many others made this saber too , which I’m not surprised being how awesome it is ).
Anyway.. trial and error and a lot of TLC brought me to this. I made some design changes to better suit dueling and strength.


The other one…. Ahhhhh welll yes… lol..
well simply , I wanted a huge powerful flashlight. I bought a 100000 lumen one from Amazon and voila. A 100000 lumen Anakin Starkiller V2
And yes… it’s bright as @!#$!!!!

Well… wanting to take a break on some other projects, I decided to wire up boards and make a couple of interesting sabers..
The first one was inspired by one of Brads builds (slothfurnace ) .. I wanted a saber that I could play with and ( I thought ) was unique enough. Going through his website all the time for clamp cards , I came across his “Derelict” which just immediately grabbed me and inspired me to make one. Well sort of. I didn’t want to flat out copy it but rather use it as inspiration to make it my own but heavily inspired by. ( somehow I found out that many others made this saber too , which I’m not surprised being how awesome it is ).
Anyway.. trial and error and a lot of TLC brought me to this. I made some design changes to better suit dueling and strength.
- Vintage flash gun top
- CFX with a tri strip blade
- USB-C rice port
- Krpixel switch
The other one…. Ahhhhh welll yes… lol..
well simply , I wanted a huge powerful flashlight. I bought a 100000 lumen one from Amazon and voila. A 100000 lumen Anakin Starkiller V2
And yes… it’s bright as @!#$!!!!
Can you share the 100000 lumens flashlight you bought?
Yeah!! It was this oneCan you share the 100000 lumens flashlight you bought?
Flashlight on Amazon
I did lose focusing capabilities. But I used a blade focus lens so now it’s in a fixed beam.
I'd love to learn more on how you went about doing the build.
Hahaha welllll it’s not all filled with a chassis and all that..
The led from the flash light went on a piece of copper I cut to fill the base of the emitter.. on top of the other copper insert that was with the emitter already.. this way I had some wire clearance.
I had a stash of these

But I don’t know if the lens is 5 degree or 8.7. I think it’s a 5 degree because it was one I had paired with an old green luxeon from way back.
The set screws that hold the nipple in are used to pressure “clamp” the copper cup and that’s enough to hold the lens in

For the switch—
The original flashlight has multiple modes ( brightness / flash / sos / etc ) and I wanted to keep that. I used the little tiny board that was used with the flashlight which has 4 smd leds telling you a) it’s on , and b) how much battery you have left . Like a PLI. I wired 2 leds from this to the clamp switch holder. One that tells me it’s fully charged and the other tells me it needs to be charged, along with the power switch.
Of course, a slothfurnace vintage card sits on top. ( shown in the other post )


The battery was wayyyy to large to fit inside of this. I ended up using a 21700 battery which puts out the same amount ( 3.7V) but with slightly shorter life span. The recharge port is in the bottom of the pommel.
The battery is wrapped with a thin layer of foam and rests in the ring section where it fits snugly, while the tiny electronics board ( also wrapped ) lives near the booster. For easy maintenance if need be.
I know this is sacrilege but I’m not ever getting rid of this so for the sake of easy grab and charge ( for the wife’s sake ) I put the recharge port here lol

I hope this helps!
Of course ( without deconstructing this ) if anyone has any questions please let me know!
The led from the flash light went on a piece of copper I cut to fill the base of the emitter.. on top of the other copper insert that was with the emitter already.. this way I had some wire clearance.
I had a stash of these
But I don’t know if the lens is 5 degree or 8.7. I think it’s a 5 degree because it was one I had paired with an old green luxeon from way back.
The set screws that hold the nipple in are used to pressure “clamp” the copper cup and that’s enough to hold the lens in
For the switch—
The original flashlight has multiple modes ( brightness / flash / sos / etc ) and I wanted to keep that. I used the little tiny board that was used with the flashlight which has 4 smd leds telling you a) it’s on , and b) how much battery you have left . Like a PLI. I wired 2 leds from this to the clamp switch holder. One that tells me it’s fully charged and the other tells me it needs to be charged, along with the power switch.
Of course, a slothfurnace vintage card sits on top. ( shown in the other post )
The battery was wayyyy to large to fit inside of this. I ended up using a 21700 battery which puts out the same amount ( 3.7V) but with slightly shorter life span. The recharge port is in the bottom of the pommel.
The battery is wrapped with a thin layer of foam and rests in the ring section where it fits snugly, while the tiny electronics board ( also wrapped ) lives near the booster. For easy maintenance if need be.
I know this is sacrilege but I’m not ever getting rid of this so for the sake of easy grab and charge ( for the wife’s sake ) I put the recharge port here lol
I hope this helps!
Of course ( without deconstructing this ) if anyone has any questions please let me know!
Last edited:
Imperial Weapon
Well-Known Member
I'm suprised I'm saying that a fan made design is better than the original but something about that midsection sleek with little details just makes OWK's saber look so much better.After a ridiculous drought thanks to work and other inanity, I've done my first install of 2022. Here is my latest Canon Flashbody saber, this time an alternate universe Obi-Wan Ep 3/4 hilt. Threaded extensions were ground down and epoxied in place in the flashbody itself, allowing use of MHS thin neck and Obi parts. I used a brass tactile behind the existing red button for activation and some gold-tone mesh + diffusing material + 8 3535 pixels in the sync cutout. The chassis is bone-simple: a speaker holder 6 from TCSS held in place with retention screws with removable 18650 battery and Proffieboard v2. Pixel connector is from CR sabers and the speaker is a random 28 mm from aliexpress. The bubble strip is cut down from a WannaWanga part and snugged with a bit of scotch tape.
It's got a solid heft and there's _just_ enough blade engagement in the TCSS holder that the blade doesn't wobble. There's some minor surface damage (pitting, slight dent in the windvane) and liberal use of Jax aluminum blackener for weathering. The flashbody itself is in really good shape, with very minimal pitting and scratching present from it's 70 year life as a camera accessory before being co-opted here.View attachment 1594916
View attachment 1594917View attachment 1594918View attachment 1594919
Here's one I threw together in a few days. I was going for a Prequel "Clan" Lightsaber vibe. I printed the key parts on my new resin printer. The rest of the parts are left over hardware store parts. The black trim is vinyl I cut on a Cricut. As a homemade build I'm pretty pleased with it. Let me know what you think.

Just tinkering around with ideas...


JediRabbi
New Member
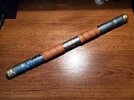
Very nice, CopperRevan. I like the mix of colors and sheens. Where's the grip from? That's quite striking!
Thanks...i actually added some stuff to it...the grip and the switchbox was from an antique welding torchVery nice, CopperRevan. I like the mix of colors and sheens. Where's the grip from? That's quite striking!
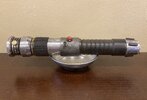
Is there anyone on here that has seen a vintage clamp like this one? I haven't been able to identify it but it looks pretty good on my psuedo-Vader custom.


It came on this flash, but no ID

It came on this flash, but no ID
Thats a vintage hieland clamp
thank you and SethS...It goes well with everything else Heiland with that black textured finish and knob but, like i said...in 25yrs of looking at vintage flash cells etc. I've never come across it.Thats a vintage hieland clamp
GreyGuard38
Active Member
Hi guys, noob here.
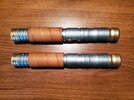
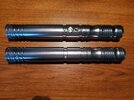
Just getting started with Star Wars costuming n' such. For my first-ever lightsaber purchase, I went with the Duellist package from Rebel Sabers. I like these, because I have two sabers, so I can spar with a friend, or practice two-saber techniques, and they can be joined together for a long single-blade saber, or use both blades for a saberstaff.
First attempt at minor customizing: sanded them with 200-grit sanding sponge, then painted with Rustoleum paints. Not sure about the surface prep, it seems like it will come off a little too easily with a fingernail. Also, the paint came out fine, but when I put a coat of matte clear-coat over it (also Rustoleum), it wrinkled-up in a few places? Kind of added to the weathered look, though.
Attachments
Joek3rr
Master Member
What was paint made of? And what was your clear coat made of? Enamel, Acrylic or Lacquer?Hi guys, noob here.
Just getting started with Star Wars costuming n' such. For my first-ever lightsaber purchase, I went with the Duellist package from Rebel Sabers. I like these, because I have two sabers, so I can spar with a friend, or practice two-saber techniques, and they can be joined together for a long single-blade saber, or use both blades for a saberstaff.
First attempt at minor customizing: sanded them with 200-grit sanding sponge, then painted with Rustoleum paints. Not sure about the surface prep, it seems like it will come off a little too easily with a fingernail. Also, the paint came out fine, but when I put a coat of matte clear-coat over it (also Rustoleum), it wrinkled-up in a few places? Kind of added to the weathered look, though.
Similar threads
- Replies
- 20
- Views
- 1,306
- Replies
- 0
- Views
- 480