New photos of the completed wings.
The wings spread over 2.7m (almost 9 feet), so one main challenge was to design them in a way they can be retracted while going through narrow corridors during an exhibit.
First I added two tenon tongues (made of double layered cardboard for strength) to each wing which fit inside a hollow space on each side of the main engine.
This mortise and tenon joint technique makes it easy to slide the wings in and out when mounting the ship. However because of the wings’ heavy weight and relatively long wingspan, they tend to arch downward and not stay flush against the main engine.
Another thing I wanted was to have the wings still loosely attached to the main engine in retracted mode so we don’t have to carry them while moving in narrow areas or through double doors.
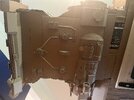
For this I put a wood beam across the main body (see above picture) along which I attached two bungee cords with tie wraps. I cut a slit in each wing where the wood beam and the bungee cords can slide into. The bungee cords are then stretched and hooked onto the tip of each wing to hold them tight when in flight mode.
Now to retract the wing, i simply have to pull it out of the mortise hole and let it hang vertically.
And voila this is how i can reduce the width of the ship from 9 feet to about 5 feet!
Now let’s talk about the wings themselves
They each feature a massive Tokamak reactor. This is probably the coolest feature in my opinion and gives the battlecruiser a very unique distinguishable look. However in more modern battlecruiser models, this feature is no longer because they have developed more efficient and stable reactor technology.
The wings are also equipped with auxiliary forward and retro thrusters to help during sharp turns.
Here’s an underside view
Another cool feature is the shield shaped tips of each wing. This part holds magnetic field coils which creates plasma shield in tandem with a core matrix to protect the ships. There are also blast doors which can be opened to let smaller aircraft (medivac, wraith) exit.
rear view:
Side view:
Front view:
Next is to add the underside details and starting the painting stage!