-
Welcome to the Project Runs Forum!
This forum is intended for interest gauging and active runs. Due to the transient nature of this forum, please keep all research and ongoing discussion in one of our main forums so your information is not lost.
Only Premium Members can start a new run.
You are using an out of date browser. It may not display this or other websites correctly.
You should upgrade or use an alternative browser.
You should upgrade or use an alternative browser.
Interest KRULL - "The GLAIVE"!!! Metal-casting KIT!!!
- Thread starter RelicMaker
- Start date
Yes, alcohol will take it off. Sometimes, it comes off just by wiping it with a damp paper towel / rag.When I glued the center crystal in, the glue left a bit of a haze on the crystal as it dried.
Will that come off with denatured alcohol and a qtip?
You can do it with black paint and a very fine paint brush, but you'll need a very steady hand...Has anyone tried to do the runes without the Rapidograph/India Ink method? That's kind of a lot of money to spend for this small part of the project...any luck?
Simpson77
Well-Known Member
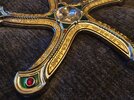
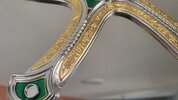
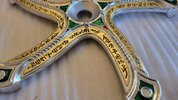
Did a little more work on my Glaive, used a burnt umber ink pigment for detailing the runes, think it gives it a little more "depth" rather than just the flat black. And you can see the pearlescent white I've gone for on the "rope" detail instead of the flat white. Gotta say I'm really liking it.
Attachments
Last edited:
Did a little more work on my Glaive, used a burnt umber ink pigment for detailing the runes, think it gives it a little more "life rather than just the flat black. And you can see the pearlescent white I've gone for on the "rope" detail instead of the flat white. Gotta say I'm really liking it.
Wow, interesting! So many options! I have some choices to make. For white, I was considering "bone white" for a little more realistic color, but your pearl white is great. Can't wait to see it when you're done!
Wow! It looks great! Congrats on completing it and doing such a good job on it!Hey Brenton, thanks for offering the Glaive kit and also providing such excellent instructions. I finally finished mine and I'm super happy with it! It was a lot of fun to make. Now I've got to get a case made for it.")
Captainrob
New Member
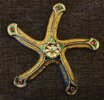
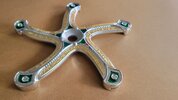
A few days ago I was able to get stage 1 of doing the gold leaf done and then spraying it with some clear gloss acrylic. I bought some gold leaf that was at the hobby shop. It didn't have the backing on it like the Mona Lisa that Brenton uses so it was a bit more difficult to work with, but still turned out great in the end. I used the Mona Lisa adhesive pen and it was super easy with it. I used some readers for the first real time in my life to do it though haha. I was hoping for a bit shinier result, but after some gloss acrylic it will help give the gold more shine.
Hopefully tomorrow I'll have some time to do another step for it. I like the case idea with some LED lights. I'm going to have to watch the movie again and see if I can tie in anything else to a case or mount from the movie.
Hopefully tomorrow I'll have some time to do another step for it. I like the case idea with some LED lights. I'm going to have to watch the movie again and see if I can tie in anything else to a case or mount from the movie.
Last edited:
Captainrob
New Member
Captainrob
New Member
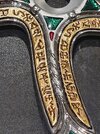
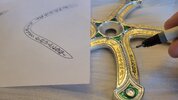
Next step. The rapidograph pen is pretty amazing. I've never used a pen I could wrote on my fingernail with. The flow was perfect for a bit, but then it slowed some and I couldn't get it to flow how it did initially no matter what I tried. It just meant that I needed to go back over things maybe once more. You should definitely do a 2nd pass no matter what because the runes will look much nicer afterwards.
If you printed the runes out then you can fold the paper since you'll only be using 1 side. Same pattern all on one side. I found the ink to dry quickly so take your time as mentioned in the video. If you screw up I found just using my finger to wipe it off really quick was usually sufficient. Make sure you have great lighting and even if you don't wear readers borrow some because it helps to have some magnification. It took me well over a couple hours to just do this one side.
If you printed the runes out then you can fold the paper since you'll only be using 1 side. Same pattern all on one side. I found the ink to dry quickly so take your time as mentioned in the video. If you screw up I found just using my finger to wipe it off really quick was usually sufficient. Make sure you have great lighting and even if you don't wear readers borrow some because it helps to have some magnification. It took me well over a couple hours to just do this one side.
Attachments
Did you do the blades yourself? Looks great!!!I decided to upgrade my blades to proper stainless steel ones. Really happy with how they turned out. The geometry of the blades is just that little bit crisper. Afraid I'm so fussy when it comes to props. A gift and a curse!!!!
Simpson77
Well-Known Member
No, afraid not. Found a bladesmith that was willing to do it for me.Did you do the blades yourself? Looks great!!!
No, afraid not. Found a bladesmith that was willing to do it for me.
Wow! If your bladesmith is willing to do more, please post a run here at the RPF. I need a set, badly!
Captainrob
New Member
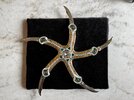
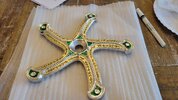
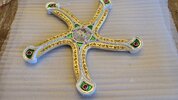
I've finished the painting, but may still do some touch ups. I'm borderline on whether or not I wish I'd have not added the white paint. It was the most difficult part of the build imo. It's very hard to make it look great everywhere.... and the glaive looked awesome before I painted it. Just something to think about if you still haven't painted yours. In the end I wanted it to be as close to accurate as possible so I decided to paint it, but I think it would have looked just as good without the white paint. You could also find an accomplished miniature painter at a local gamer store and commission them to paint if you don't want to try it yourself. I have yet to add the crystals on one side and then the blades.
Attachments
Captainrob
New Member
Has anyone made some mounts or displays yet? I could use some ideas.
Similar threads
- Replies
- 16
- Views
- 1,339
- Replies
- 41
- Views
- 3,130