Rehearsal Stunt Lightsaber - "The Core" sequel

Yeah, I agree. Not bad for the limited tool access you've got!

Maybe if you do another core, the shop could chuck the stock in a lathe and bore the big hole for ya, so it'd be centered and true. Shouldn't take more than a few minutes, depending on whether they've got a lathe freed up.

Or, you could send your next one to me, and I'll bore it for ya.

Nice work, Tom, keep it up!
 
This in an amazing project! I'm a new here but have read this thread before. I've been itching to try my hand at building an LED lightsaber, but after seeing what you have been working on, the reflective material the stunt sabers themselves I'm ever changing my mind about the electronics route. This is just too cool! Awesome work sir!
 
Just watched your last video - a couple of hints (called hacks these days I know) for your future use. If you don't want to have to clean off the black scale from your mild steel see if you can buy 'bright' mild steel instead. It's what I've been getting for my drive shafts. It's a clean smooth suface but is on spec - that is if it meant to be 15mm diam it'll measure that. It's a little more expensive but save's a lot of hassle (it's designed to).

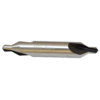
Second ; if you want to keep a drill on track & not wander get yourself a center drill (see pic) It's meant for putting a recess into the end of bar stock to locate on the tailstock center of a lathe when machining between centers. For drilling it makes a short pilot hole & stops the grill wandering off. When I want a largish hole (such as you have here) I start with a smaller drill, about 2/3 the diam & drill that 1st then open it out on a second pass the size I want. If I want a really accurate hole or really large hole I'll open to final size with 2 or 3 increasingly larger drills. This should help with your set up, takes longer I know but you really need heftier equipment for what you were attempting here.

proxy.duckduckgo.com.jpeg
 
Tom I've got a newbie question the inner rod that goes into the blade , is it secure inside by the grub screw in the blade collar? Or is there glue or something else helping to hold it in place?
 
Dammit! "little bit of heft to the tube wall, it's not like 2mm thin, it had to have enough meat to show up on camera, but a full 1/8 wall was too thick"

my video got cut off at the end.
 
Well done tom! The double collar makes total sense now!! It makes it so it won’t crush the blade with clamping to the rod.

Another thing I like about your projects is you prove it can be done with minimum tools.

Great dedication brother!

Yes! It confirms for me that the blades had a thin wall and were hollow AND the rod was skinnier than the blade. They had to fill in the gap on the inside.

Yeah, I agree. Not bad for the limited tool access you've got!

Maybe if you do another core, the shop could chuck the stock in a lathe and bore the big hole for ya, so it'd be centered and true. Shouldn't take more than a few minutes, depending on whether they've got a lathe freed up.

Or, you could send your next one to me, and I'll bore it for ya.

Nice work, Tom, keep it up!
Thank you, it means a lot. I actually want to do this again and I might take you up on that offer.
Just watched your last video - a couple of hints (called hacks these days I know) for your future use. If you don't want to have to clean off the black scale from your mild steel see if you can buy 'bright' mild steel instead. It's what I've been getting for my drive shafts. It's a clean smooth suface but is on spec - that is if it meant to be 15mm diam it'll measure that. It's a little more expensive but save's a lot of hassle (it's designed to).

Second ; if you want to keep a drill on track & not wander get yourself a center drill (see pic) It's meant for putting a recess into the end of bar stock to locate on the tailstock center of a lathe when machining between centers. For drilling it makes a short pilot hole & stops the grill wandering off. When I want a largish hole (such as you have here) I start with a smaller drill, about 2/3 the diam & drill that 1st then open it out on a second pass the size I want. If I want a really accurate hole or really large hole I'll open to final size with 2 or 3 increasingly larger drills. This should help with your set up, takes longer I know but you really need heftier equipment for what you were attempting here.

View attachment 1031266

Thanks! I need to invest in a few more things to help keep things true next time. I went up with multiple bits but the first wasnt true.

You're right, I need a bit heavier machinery to pull this off as clean as a field marshall part!

Bright mild steel, I'll look into it. I noticed this took VERY well to sandpaper and not so well to grinding stones, like it has a grainier composition. The piece I got.. it was a drop-cut lying on a shelf that happened to be the right diameter. I nabbed it instead of asking someone to special cut a specific piece of material and that ended up at a discount
Tom I've got a newbie question the inner rod that goes into the blade , is it secure inside by the grub screw in the blade collar? Or is there glue or something else helping to hold it in place?

The rod is actually held REALLY tight by two opposing set screws in the collar. I took a cutting disc on a dremel and cut a ring into the tang at the exact height, so that I can insert the rod in any orientation and the groove will help keep it from skipping out under the set screw nub. I believe the V2's nipple is the same set-up, two set screws at 12 and 6 O clock.
 
Also, before the center drill, get an automatic center punch.

But yeah, you can get some really cheap center drills at harbor freight, in a pinch.
 
Yes! It confirms for me that the blades had a thin wall and were hollow AND the rod was skinnier than the blade. They had to fill in the gap on the inside.


Thank you, it means a lot. I actually want to do this again and I might take you up on that offer.


Thanks! I need to invest in a few more things to help keep things true next time. I went up with multiple bits but the first wasnt true.

You're right, I need a bit heavier machinery to pull this off as clean as a field marshall part!

Bright mild steel, I'll look into it. I noticed this took VERY well to sandpaper and not so well to grinding stones, like it has a grainier composition. The piece I got.. it was a drop-cut lying on a shelf that happened to be the right diameter. I nabbed it instead of asking someone to special cut a specific piece of material and that ended up at a discount


The rod is actually held REALLY tight by two opposing set screws in the collar. I took a cutting disc on a dremel and cut a ring into the tang at the exact height, so that I can insert the rod in any orientation and the groove will help keep it from skipping out under the set screw nub. I believe the V2's nipple is the same set-up, two set screws at 12 and 6 O clock.
[/QUOTE

Is the collar attached to the blade base the same manner? Set screws keep the collar attached to the blade?
 
Is the collar attached to the blade base the same manner? Set screws keep the collar attached to the blade?
Yes! The holes that I drilled and tapped run through the collar, ski pole and inner collar at once. Mechanically the threads pinch everything together
 
Love it, Tom.

At the moment I only have one set screw in my collar/sleeve. What led you to think there are two?

I'll check the 4K movie. What's the time stamp for that frame?
 
Love it, Tom.

At the moment I only have one set screw in my collar/sleeve. What led you to think there are two?

I'll check the 4K movie. What's the time stamp for that frame?
Thanks! I think it was either Brandon or someone else verbally describing the blades or this saber. I just bought 15mm foam strip!
 
Are you sure you're not confusing Brandon's comment on my Darth Vader painted blades thread ? where he says the V2 has 2 grub screws in the nipple. It may pay to check, if you can, as other people are likely to follow your lead.
 
Sorry guys, it took me a while but I found it.

so Brandon described the saber very well, even said there is a small threaded hole in the top of the main tube. We have good shots of the top of the saber and I haven't seen it yet, so I haven't added it.

In a private message with me, KraamStar confirmed what we see in those photos from the video, that "There are two tiny holes in that ring which might be grub screws also used for holding the blade in the handle"

He isn't able to share more due to legal stuff, so I want to openly say how thankful I am he's able to confirm things we already see anyway. There are 1-2 other details that I haven't been able to find in our photos, that may equally be something misremembered or something we don't see yet. Havnen't brought them up because of the lack of usefulness.

I got my gaffer tape today! it's the smooth kind. In the video/pictures it doesn't look like the woven fabric style, but the slick one, that covers the clamp.

Also, I've noticed it is probably in 1" strips. The leftover strip today is a singular section. during ROTJ rehearsals you can see a second strip on the shroud area that has since fallen off and probably been thrown away

pics in a second..
 
I got permission from our friend that it was okay to share the cropped photo of his hands
SABER_SWR.jpg

See the smooth tape. Also, see the tape coming in sections on the emitter. 2 sections during ROTJ (from seth's guide?) and 1 section today.
Screen Shot 2019-06-23 at 10.59.21 PM.png
Screen Shot 2018-01-05 at 7.00.58 PM.png
foamgrips.jpg
 
I tested out the gaff tape patterns, looks like today the bolts are exposed, so an xacto knife did the trick
20190626_121218.jpg

I tried to duplicate the thickness of the band. I got 2" gaff tape to really cover the clamp.. funnily enough it's 2 or 3 mm short so I did two layers. Before the wraps I cut a slice to go around the clamp box too
20190626_120910.jpg
20190626_120851.jpg
20190626_121136.jpg
20190626_120954.jpg
 
In a private message with me, KraamStar confirmed what we see in those photos from the video, that "There are two tiny holes in that ring which might be grub screws also used for holding the blade in the handle"

Nice work, thanks for extra effort, I know it can be a pain but it stops controversy later on. This is looking real nice now.

It looks wrinkly like paper, and it would be about 2mm in depth, covering up some of the collar and hiding the raw metal core

Might this be cardboard or thick card disc(s) ? Old card can end up looking like that having got damp & dried a few times in dusty corners. Hardboard could be another posiblity if it's shead a surface layer or two over time. Wouldn't take long to cut some out - then just store it in outbuilding for a few years...

This looks very like a hole made with a center drill & is just the place you'd find it if this was a wooden dowel turned down on woodworking lathe.

SABER_SWRtip.jpg

Also looks like some golf sticks I have.
 
This thread is more than 4 years old.

Your message may be considered spam for the following reasons:

  1. This thread hasn't been active in some time. A new post in this thread might not contribute constructively to this discussion after so long.
If you wish to reply despite these issues, check the box below before replying.
Be aware that malicious compliance may result in more severe penalties.
Back
Top