Unlimited Run Hellboy Sidearm - Comic Version (3D Printed Kit)

Re: 3d Printed Hellboy Sidearm (Comic Version)

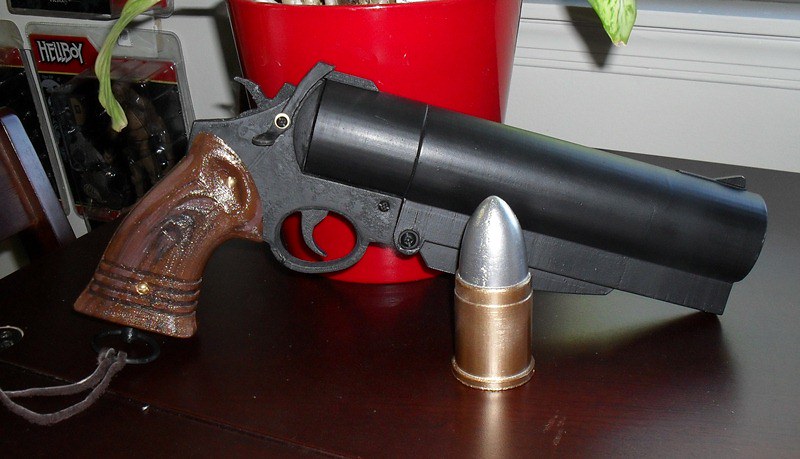
I think it was pretty straight forward how it all went together. I'm still assembling mine; currently epoxying nuts and aligning screws so I can disassemble the handle and split the housing for the trigger and hammer.
I assumed that the flat for the combustion chamber goes downward and it seems to nest optimally in that fashion. Some alignment tabs or buttons would have been nice, as super-glue doesn't give you but a few seconds to align everything properly. I think I was a bit lucky getting everything to line-up on the first attempt.

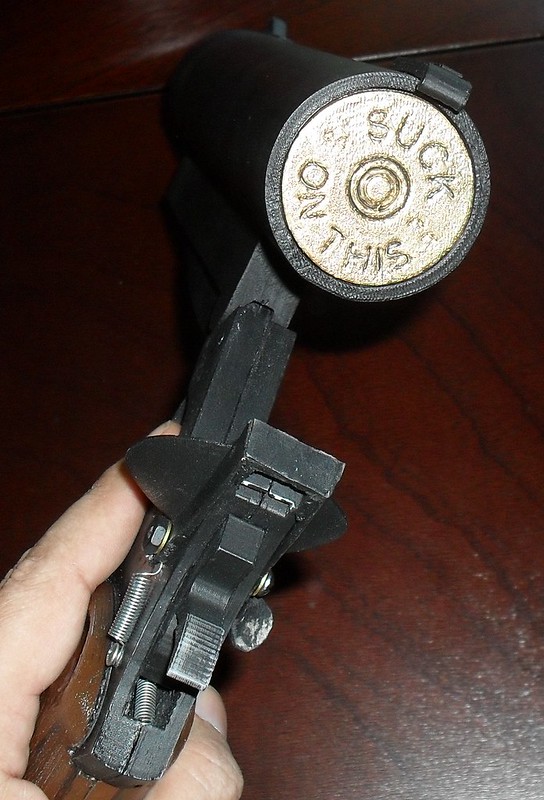
I added a #10 nut + screw to the pivot and plan on making a Webley type of release for the top. I'll post photos once I get the spring assemblies complete and then again after sanding & painting.

A little more planning and I think you could prep these so that the trigger and hammer actuate with the addition of some light springs.
-Terry

We thought of a key, but because of such small tolerances in that area and the fact that that seam is supposed to stay visible, we didn't. Love your other ideas, keep the pics coming.
 
Re: 3d Printed Hellboy Sidearm (Comic Version)

Here is my Comic samaritan assembled and primered.
There are nuts and screw assemblies, and I added a webley style catch for the break-top. It's a bit inconspicuous in the photos, but it works very well to secure the barrel.
14443409823_23f4c9e79c_o.jpg

14443409883_f583b1fee3_o.jpg

14422095704_27879b125b_o.jpg


I may bug you about selling me a couple more bullets just for props. Thanks Gries Monkey!
-Terry
 
Last edited:
Re: 3d Printed Hellboy Sidearm (Comic Version)

Here is my Comic samaritan assembled and primered.
There are nuts and screw assemblies, and I added a webley style catch for the break-top. It's a bit inconspicuous in the photos, but it works very well to secure the barrel.
https://farm4.staticflickr.com/3871/14443409823_23f4c9e79c_o.jpg
https://farm4.staticflickr.com/3851/14443409883_f583b1fee3_o.jpg
https://farm4.staticflickr.com/3900/14422095704_27879b125b_o.jpg

I may bug you about selling me a couple more bullets just for props. Thanks Gries Monkey!
-Terry

Frickin cool!!! Love it, great ideas in there too. PM me about the bullets anytime
 
Re: 3d Printed Hellboy Sidearm (Comic Version)

Pretty cool project.
Is it made from FDM ABS?
I'm still pretty new and figuring the site out but I'll have to find a way to search your other project threads too.
 
Re: 3d Printed Hellboy Sidearm (Comic Version)

Pretty cool project.
Is it made from FDM ABS?
I'm still pretty new and figuring the site out but I'll have to find a way to search your other project threads too.

Thanks, yes it's done on a MakerBot with ABS. To find most of my stuff, click my name and look at latest posts.
 
Re: 3d Printed Hellboy Sidearm (Comic Version)

Last photo. All the pieces disassembled. You can see the modification made to the hammer ad trigger to make them actuate (single action). Also the opposite side that's been routed out for space. The "n" shaped piece at the bottom of the pic is the Webley style closure.
14465871435_274119af98_c.jpg
 
Re: 3d Printed Hellboy Sidearm (Comic Version)

Last photo. All the pieces disassembled. You can see the modification made to the hammer ad trigger to make them actuate (single action). Also the opposite side that's been routed out for space. The "n" shaped piece at the bottom of the pic is the Webley style closure.
https://farm4.staticflickr.com/3891/14465871435_274119af98_c.jpg

WOW! That's way cool. Great job. If I ever get to keep one, I should send it to you to pimp it out!
 
Re: 3d Printed Hellboy Sidearm (Comic Version)

I've got the springs (tinkerers never throw any greeblies away)! It will cost you a bullet.
-Terry
 
Re: 3d Printed Hellboy Sidearm (Comic Version)

Ok. I lied. A couple more photos. This is such a slick model kit.
I still haven't weathered the metal (black) parts. But I did accent the "wood" grips, and put a couple coats of shellac on them. You can also see that I ground down the safety so it didn't interfere with the break-top lock.

14465090801_15c74570ba_c.jpg

I also finished the bullet. I don't know if it was mentioned anywhere else, but the bullet is a serious 1 3/8" diam (1.375 cal) and is 3.75" long/tall. and the round pulls free of the casing if you want to show people how massive the slug is.
14282001937_5df2b1a918_z.jpg

14468448185_6e9e656c6b_c.jpg


It is very true to the comic.
14445350926_6cd9cbe9f1_c.jpg


I think you did an outstanding job with this kit, Gries Monkey. I've been tinkering with how to display it. The couple places I intended to display it, seem not to do it justice. I want it to look inviting for people to pick-up and handle it now that it cocks and trigger snaps the hammer. I also want to say that I really appreciate your quick turn around on this and the simplicity of the assembly (15 pieces I think including the bullet?).

-Terry
 
Re: 3d Printed Hellboy Sidearm (Comic Version)

Thanks for the compliments, I'm glad you like it. What you've done is really cool, more than I've ever imagined, and that's what's so fun about doing these kits. I wish more ppl would post pics. I need to print one out for myself, I don't even have an unfinished one anymore, @Biggeek1972 took mine. :cry If you want another of the huge bullets, PM me.
 
Last edited by a moderator:
Re: 3d Printed Hellboy Sidearm (Comic Version)

Yes I ripped it outta your cold de...ehem.. Hands :) hit print again :)
Thanks for the compliments, I'm glad you like it. What you've done is really cool, more than I've ever imagined, and that's what's so fun about doing these kits. I wish more ppl would post pics. I need to print one out for myself, I don't even have an unfinished one anymore, @Biggeek1972 took mine. :cry If you want another of the huge bullets, PM me.
 
Re: 3d Printed Hellboy Sidearm (Comic Version)

rgriesbeck You did say you would like more pictures of this kit, so I will try to upload some of the ones i took while working on it.


First of this was a nice kit to work on. The print is solid and looks amazing once completed.


Before I ordered this kit, i asked if you thought it would be a good starting kit to really get into prop making and now that I have completed it, i have to agree that it was indeed a good kit. It was nice to work on something, that to me at-least, felt larger and more professional, then most projects I have worked on so far.


That being said I also learned a lot working on this project. Both from actually trying new things, as well as making mistakes and having to solve the problems these mistakes caused.


The first thing I did once the kit arrived was to lay it all out on a table to get a good look at the kit.

IMG_0151.jpg


I decided to start working on the bullet first and work on the kit as a two part process. Finish the bullet first, then work on the pistol. The plan was to rush into the project and be able to see part of it finished fast. Looking back on it now, I probably worked too fast on the bullet itself, losing some of the detail I was going for. This was my first mistake on this project but not the last or worst one. As you can see I should have spent more time making sure the bullet had a smooth outer surface, I did however learn from this mistake and as a result, spent more time making sure the pistol was ready before I started to assemble and paint it.


To clean-up some of the excess plastic inside the lettering on the bullet, I used a needle, a pair of pliers and a creme brulee burner that I had tried to turn into something resembling a hand-welder. I warmed up the needle and carefully melted away the excess plastic while being careful not to damage the lettering itself.
IMG_0160.JPG


Afterwards I gave the bullet a quick paint job and started working on the pistol itself.
IMG_0170.jpg
firespiter How did you get your bullet so smooth?


I spent two hours sanding every part of the pistol to make sure the surface was smooth using sandpaper. Afterwards I started using green stuff to plug a few small holes and gaps in the plastic. I then assembled the pistol without using glue, to see how well the parts fit together. It turned out they fit together really well.


I then spray painted all the parts of the pistol and started assembling it properly. This is where I made another mistake. I should have spent some time actually looking at the pictures of the finished prop, instead of getting too focused on working on the prop itself. As a result I put part of the barrel of the gun on wrong and didn’t notice till after the glue had hardened the next day.

assemble1.jpg


That meant bringing out the dremmel and cutting part of the barrel off the gun again, smoothing it down and then assembling it correctly. I then noticed another problem. Part of the green stuff I had been using to plug holes and and gaps had shrunk during the night and I had to do it all over. I did this about 3 times before figuring out that I was using the wrong kind of green stuff for the job. Lessen learned the hard way for future projects.
IMG_0175.JPG


During the assembly, the little metal pin that had been included in the kit, to create the mechanism of opening and closing the gun, gave me a few of problems. I simply couldn’t get the mechanism to work without parts simply falling off. Mostly my glue wouldn’t stick to the metal as well as the cover screws. As a result I ended up cutting down one of my cheap wooden pencils and using it as the pin. This worked like a charm and has held up to all the use that the prop has seen so far.


I used the dremmel to drill a hole on each side of the guns opening mechanism, so that I could add a two neodymium magnets to help stabilize the prop. This worked really well and I can now handle the prop reliably without the gun suddenly opening by accident. On a side note, the plastic latch on top of the gun does stabilize the gun really well and adding the magnets was probably overkill, but better safe then sorry. Besides, I love working with magnets.


After that the gun got a nice paint job and it now resides on one of my shelf’s. There is still a few details left that I need to work on, before I post a picture of the finished gun.

IMG_0176.JPG
 
Last edited by a moderator:
Re: 3d Printed Hellboy Sidearm (Comic Version)

My bullet got pretty smooth. I started with 220 and went down to 500 grit sandpaper. and I did a heavy primer that probably got rid of a lot of imperfections.
I actually did more filling and sanding/repainting after the above photos.
The bottom (suck on..) seems to be rough on all of them. I bought a second bullet from Rob, and left most of the ridges in place, and once sprayed it looked like billet machined (which is okay, but the smooth bullet looks better imo).
-Terry
 
Re: 3d Printed Hellboy Sidearm (Comic Version)

Nice job @knightrix! You did a great job and even did some customizing on your own. You might be ready to tackle the Samaritan ;)
 
Re: 3d Printed Hellboy Sidearm (Comic Version)

I've printed a spare gun, have it in stock for immediate shipping!
 
Re: 3d Printed Hellboy Sidearm (Comic Version)

Had some time to work on the gun again and worked a bit on the paintjob.

I am still not perfectly happy with the handle but I am slowly getting there.
I dont know If i will be happy with it before i get it to look like real wood or get a actual wooden handle made.

IMG_0640.jpg
IMG_0633_2.jpg
 

Attachments

  • IMG_0633.jpg
    IMG_0633.jpg
    1.7 MB · Views: 112
Last edited:
This thread is more than 4 years old.

Your message may be considered spam for the following reasons:

  1. This thread hasn't been active in some time. A new post in this thread might not contribute constructively to this discussion after so long.
If you wish to reply despite these issues, check the box below before replying.
Be aware that malicious compliance may result in more severe penalties.
Back
Top